Showing posts with label Konstruktor. Show all posts

Sunday, May 22, 2016

Lo-Fi Comparison - Konstruktor, P-Sharan and Viddy

I brought a slew of gear with me on my last photography outing for multiple reasons.  I wanted to run my first test roll on my Viddy Pinhole, I wanted to further test my Konstruktor for scratches and double exposures, and I wanted to knock the dust off my P-Sharan pinhole and see if I could get my exposures correct.  As I had all these toys with me, I figured I would also do some comparisons between the lo-fi cameras to get some idea on each camera's perspective on the world by shooting the same scenes with the different cameras.  I was not particularly scientific in my methods - I used my tripod for the pinholes, but hand-held the Konstruktor which means the latter was not necessarily shooting from the exact same spot - but this was more of a general experiment for my own reference of "how much of the scene does the camera see". The Viddy shots are generally fogged from a light leak and the P-Sharan shots are generally underexposed which throws the color off, but I'm ignoring those details for this post and just looking at perspective.

To save myself some labels, my Konstruktor had Fuji 400, the P-Sharan had Kodak Ektar 100, and the Viddy had Ilford HP5 400, and the shots were all done in Wallace Falls State Park, within a half mile of the parking lot.  

For a quick refresher... the P-Sharan is the black camera on the left, the red box is a Viddy, and the Konstruktor is in the blue case... but looks like this:

The Konstruktor has a shutter, which made it easy to hand-hold.  For the pinholes I used the high tech technique of balancing the cameras on my tripod.  The P-Sharan is held together with rubberbands (again... high tech here) so I stretched one band over the edge of the tripod head to keep it steady.
The Viddy was large enough to simply balance, however given the softness of the images I think I will try to strap it down to the tripod next time.

On to the comparisons!

 My first stop along the trail was at the first bridge, using the bridge railings to get an idea of "lens" width and perspective.  The Konstruktor shot was hand held, and not centered on the bridge because I though I already had a centered shot on another roll (that shot turned out to be too dark to scan, so this is what I have)  The P-Sharan and Viddy were in the exact same spot on my tripod (which is the set-up shot you see above)


Konstruktor

P-Sharan

Viddy


Second stop, the other side of the first bridge looking back.  In this example I had the Konstruktor generally shooting the same scene - the difference being that I held it below my chin for viewing, and had set up the pinholes on the tripod roughly eye-level.  The Viddy ended up being turned slightly right on the tripod so the bridge was not centered.

Konstruktor

P-Sharan

Viddy

Shot # 3 - the small falls.  To get to this spot, you take a little spur trail off the main trail through which leads to a boardwalk through a thick bunch of raspberry bushes.  Though the falls are only 20 feet from the main trail, close enough to hear people hiking, the spot is secluded by the raspberry bushes.  I spent a good amount of time here experimenting with exposure lengths, and this is probably the most accurate comparison of the 3 cameras shooting from the same spot.

Konstruktor

P-Sharan

Viddy

One last comparison shot, these were taken from the hiking trail looking down at the river, right where the trail leaves the river and begins to climb to the main viewpoint for Wallace Falls.

Konstruktor

P-Sharan

Viddy

The basic end conclusion I've drawn is that the Konstruktor is a fairly standard view, the P-Sharan is quite wide, and the Viddy is pretty zoomed in.  This experiment gives me a better idea of how much of a given scene each camera will see.  

Up until now, all my exposures have been "poke-n-hope", looking at the scene and guessing whether the camera will consider it "cloudy" or "partly cloudy", etc...  Unfortunately, as I said earlier, many of my shots were underexposed as a result.  Since this outing I attended a pinhole photography lecture, and having taken what I learned there, and with a little bit of research online, I've managed to find enough information on my two pinhole cameras to utilize one of the many pinhole calculation apps which are available on the web.  The Viddy's pinhole measurement is listed on the description of the camera, and I measured the distance from the pinhole to the film plane to get the focal length, the calculator gives me the f/stop from there. My P-Sharan has the f/stop and focal length printed on the front of the camera.  I was unable to find the pinhole size online because my model of camera is no longer available, but the calculator did the math with the numbers I have and came up with a pinhole size.  The size is incredibly close to what is advertised for the new model of P-Sharan, so assuming they use the same pinhole size, the calculator seems accurate enough.  On future trips I'll be using my DSLR to meter the scene, and plug that into the calculator for each camera to come up with an exposure length.  Even if it is not perfect, it should be far less "poke-n-hope".


Wednesday, May 04, 2016

Second Konstruktor Test

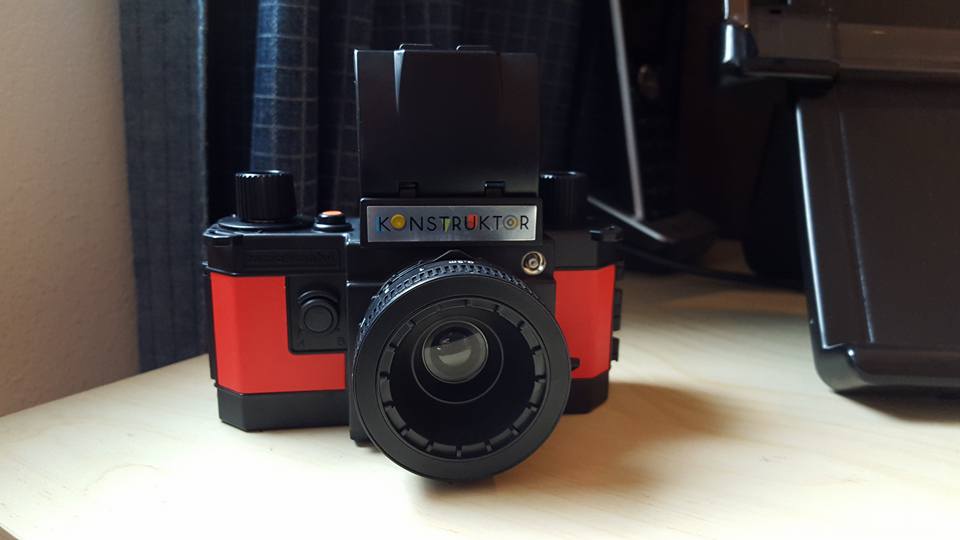
Last winter I built myself a new 35mm plastic camera, the Konstruktor.


I have not had much shooting opportunity since my initial test run, however I've had the camera loaded with a second roll since I made it home from the first test run.  After bringing the Konstruktor with me on a field trip to Victoria BC (where I only had time to shoot passing landscapes from the ferry) and on a quick outing to Seattle, I decided to burn through the rest of the film around my yard and at a garden store to complete my second test run.  For the most part the spacing between shots was good, only a little overlapping which might be cause by pressing too hard on the film knob (which would pull the unused film too tight in the roll and prevent it from fully advancing)  The shots here are quick and dirty low resolution scans, only cropped and dust spots removed but are otherwise unedited.

All but one of my ferry photos showed extreme motion.  This serves as a reminder to be careful when taking the camera out of the camera case and check to see if it is on "Normal" or "Bulb" prior to shooting.  Though the ferry ride was a couple months ago, I have a vague recollection of realizing that the camera was set to "bulb" while I was on the ferry... my last shot from the boat and all subsequent shots are all perfectly clear.  

I noticed two prominent scratches down the length of the beginning of the roll of film.  This could be from the camera or the lab's C-41 machine.  Scratches can be edited out in PS, however the process is a tedious pain.  I'm posting this to keep an eye out on future rolls, and to remind myself to check the knob on the film roll to make sure it is not pressed down and pulling the film too tight in the camera.

The closer-up focus might not be entirely accurate (see the pig above) however infinity appears to be pretty sharp.  

Here is my only accidental double exposure.  My first test roll had several, and I wasn't sure if it was due to a camera malfunction or human error.  I suspect this could have been human error as I was wandering a garden store and being called this way and that at the time that I shot these.  I noticed the vignette effect of the plastic lens is enhanced when the frame is double exposed.

The last two shots on the roll overlapped, creating one image with two viewpoints of the same rose - without a counter on the camera body, I expect this happy accident to occur on probably every roll of film.

Overall I'm happy with the second roll, and I believe this camera has some real potential for fun with fewer lomography flaws (though I know the flaws are the "personality" of plastic shooting, sometimes I just want evenly spaced negatives without light leaks!)  I need to be mindful of the film knob tension and the photo setting, and perhaps with roll 3 I'll remember to play with the bulb setting on purpose. 


Thursday, February 04, 2016

First Konstruktor Test

This week I had to make a run out to the airport, so I took some time on my return drive to stop off at a local botanical garden to test my recently built Konstruktor 35mm camera.


Outside of my initial troubles with the film advance knob during building, the use of the camera is fairly straight forward.  Open the view box on the top, flip the internal mirror up to see through the lens (lever located by the lens), choose your exposure (Normal or Bulb) compose, focus, press the shutter release button (on the top) advance the film.

I like the way the view box is constructed.  Each component has a little tab to use to flip it up, and they lock together to hold the viewbox open.  There is even a tiny magnifying glass built into the top  that you can use for closer viewing, however without flipping that up it is possible to hold the camera at your waist to compose and focus.  The mirror is pretty bright, once it is flipped up.  (most of the time it took several attempts with the mirror lever to get the mirror to stay put)

I also decided to load one (probably final) roll of film into my TLR to do a final "tape every inch of the door" light leak test.

The camera is upside down here, I taped over the bottom hinge.
Taped all the way around the bottom.
Tapes all around the edge of the back "door" where I load the film.  (the note on the back is because the viewer is so hard to see through that I had to remind myself where to put the lens when focusing)

While I was out, I frequently stood in the sunshine and turned both cameras over, allowing the sunlight to hit it at every angle, both with the viewfinders open and closed.  I had planned on shooting the exact same shots, from different angles, using the two cameras, however about 3 frames in, my TLR's shutter (to add insult to injury) started defiantly sticking.  Perhaps it was jealous that I took another film camera out in the field.  Or it is just tempermental.  In any case, I didn't bother to scan most of the frames as they are mostly overexposed and blurry from camera movement with a long shutter.

And there is the whole "light leak" problem that clearly did not disappear
I scanned the adjacent gap between frames to show the red streak that has plagued so many of my rolls of film.  The leak is either from the viewfinder being open in the sun, or from light reflecting inside the film box when I shoot with the sun to my right.  In any case, I just can't reliably use this camera in daylight, add to that the sometimes-sticking-shutter and the TLR is officially retired to my shelf of "I can't shoot with them but aren't they pretty?" cameras.

On to the successful part of the day, the Konstruktor!

First of all... NO LIGHT LEAKS (so far)  With no special taping, and with keeping the viewfinder open and turning the camera this way and that in the sunshine, I saw no evidence of light reflection or light leaks on any parts of my film.  It is such a relief!

As for the image quality, I do enjoy the nostalgic feel of the plastic lens and film combination.  The focus seems to be fairly accurate with what I saw in the viewfinder (though the viewfinder seems to be sharper than the resulting image)  I like the vignetting that I get from the lens, and I *love* that the film advance knob stops after each frame, so I'm not wasting film over-rolling or overlapping shots by under-rolling.

Here are some of my images from the botanical gardens
This is a meadow along the trail... testing the infinity focal length.

Here are ferns growing out the side of a tree trunk, testing the .5m focal length.  It looks like I get some depth of field on this setting


This is probably my favorite shot on the roll, again testing the .5m focal length

This was set to infinity... the little brown streak in the air near the center/bottom is actually a juvenile bald eagle riding thermals... I did curse under my breath for my decision to leave the big DSLR and lens at home, but this was only meant to be a quick stop to test the film camera. Still... birds!

This was an intentional double exposure

This was an accidental double exposure.  I'm not sure if I forgot to advance the film or if I hit the button accidentally while pulling the camera from its case.  

The next thing to test will be the bulb setting, and the challenge will be to remember to advance the film after each shot.

Monday, February 01, 2016

Konstrukting the Konstruktor

Ever since I was introduced to the Holga back in early 2000, I've enjoyed playing with lo-fi photography (or, lomography)  The quirkiness of each individual plastic lens and camera body makes for unique and sometimes surprising images, and working with film reminds me to slow my shooting process down, and take care with the limited amount of frames I have to work with on a given roll.  I've gone through several Holgas over the years, built a pinhole camera from a cardboard punch-out kit, and tried a few funky fisheye and extra-wide-angle plastic cameras just for fun.

Several years ago, I built a home made twin lens reflex camera from a kit that D bought for me.  Since then, the little black box has accompanied me on many adventures, producing unique images with a nostalgic feel.  The last few times I've brought it out, however, I've had an increasingly frustrating battle with red streaks across multiple frames of my film. While I understand that light leaks are "part of the personality" of a plastic camera, I really wanted cleaner shots... and I have spent a lot of time experimenting and running rolls of film, spreading gaffer tape over every crack and crevice that could possibly affect the film box to the point where the camera exterior was more tape than plastic.  I *thought* I had it beat....

...then I picked up my 2 rolls from my last trip, and it was filled with more "light leak" streaks that I've encountered yet with this camera.  I recall the sun's location when I was shooting the worst of the streaked shots, and I know that I had my camera inside my bag at all times outside of when I took it out to make a shot (in order to minimize potential exposure) so I've come to the conclusion that these are not leaks from the camera back.  The interior of the film box is quite shiny, and it looks as though I'm getting some kind of reflection from the front of the camera (in horror films, this would equate to "the call is coming from inside the house!")  It seems to happen in bright light when the sun is to my right, the angle seems to make the sun reflect off the interior when the shutter is released.

Coincidentally, I'd been eyeing the Konstruktor lomo kit for quite some time, but had held off buying it for myself because I rarely carry two kit cameras with me on any given trip.  Building another kit would require me to decide which camera I wanted to take with me, and I wasn't sure I was ready to give up on the TLR entirely.  The plethora of red streaks on my latest film helped nudge me in the direction of New Toy, and so, inspired by frustration, I clicked away and bought a Konstruktor.

The box says "build in 1-2 hours" which is initially true.  However as with other kit cameras, the instructions are somewhat minimal (more like pictures in a Lego set than instructions) Here is the initial build in high speed:


What I did not show in the video, however, was the first time I loaded the film and found that the film advance knob was locked up.  Admittedly, I had forgotten one gear for that part, and that was my first "take apart and rebuild" attempt, but the knob kept locking even with the proper gear in place.  I searched online, but could not find anybody else with the same problem, though I did find one person who suggested spinning the film take-up clockwise (even though the instructions, every other video, AND the camera's direction arrow clearly point counter-clockwise)  Clockwise didn't work either.  After much rebuilding and testing on my own with the back out of the camera, I concluded that two wheels needed to move together, and the "film counter" disc in between was preventing that from happening.  Every review online said that the film counter was not accurate, and my TLR never had a film counter anyway, so I opted to remove it... which seems to have resolved the sticking issue.

Stickers on to personalize the camera, and I have my new toy:


I have loaded film for testing, so fingers are crossed that I've built it correctly.  I plan to take it out in bright conditions if possible to check for light leaks (aka "personality") and will go from there.

The mystery of my TLR does still bother me.  I have poked and prodded and removed lenses and tested it with a flashlight and the red streaks still make no sense.  I seal Every. Single. Seam. with gaffer tape and still end up with streaks.  I am tempted to load one last roll in the TLR and shoot alongside the Konstruktor, in the same conditions, and maybe even wave it around in bright light just to see if it really is an internal issue.  This is one downside to the TLR as compared to the Konstruktor... the TLR doesn't come apart quite as easily and so unbuilding/rebuilding is not much of an option.  I admit, I'm tempted to start another TLR from scratch as well, but I think I'll do one last test on my current one instead.  Maybe I forgot one crucial piece of tape last time I was out.... just to ensure I'm not going crazy, I'll take pictures of it with my cell phone so I *know* for sure what is taped shut.