Tuesday, January 30, 2018

2017 Christmas Projects

The decorations are all packed away, the post-holiday dust has settled, and a slew of home repairs have been accomplished.  Time to catch up on some project blogging!


Crochet

Though my mother taught me how to crochet when I was a kid, I never did learn how to read a pattern.  I could make wobbly squares and long strands that looked like worms (which I gave to friends as bookmarks.  Get it?  Book worm?) but that was the extent of my yarn experience.  A few years ago I picked up a pattern for an infinity scarf, which I was able to complete, but once the arthritis began to set in to my wrist joints, I figured I'd have to give up on the idea of crochet all together.

Then I discovered they make hooks with padded handles for arthritic crafters.  So I owed it to myself to pick one up and see what I could do with it.  Also, the Seahawks colored yarn was on sale.  With the help of YouTube I was finally able to decipher the pattern for a simple granny square.


The hook works great!  Though I failed to take a photo of the end project, I ended up putting about 9 granny squares together into a scarf, which was given away as a Christmas gift.

In my early season "look how much time I have!" days, I attempted a few "simple crochet snow flake" patterns, which I had intended to stiffen up with starch and give away as ornaments.  I completed a few, but upon realizing those patterns required tiny stitches and precise counting, and as I ran out of craft time, I put them aside and concentrated on larger gifts.

This scarf was from a pattern called "Shawl in a Ball" - once the first row was completed, it was just turn, repeat, turn, repeat until I ran out of yarn.  

My daughter had actually picked the yarn out while we were shopping together, so I made this for her for Christmas.  She was very surprised when she opened it, as she'd seen me work on it all season.

Sewing:

Speaking of my daughter... she taught herself how to knit this fall, so I found a pattern for a knitting needle holder and picked up some specially printed giraffe fabric (giraffes are her favorite animal) as another Christmas gift for her.


I have a friend who loves - and collects - pink flamingos.  When I saw this fabric in October I immediately thought of her.  I wasn't sure what I would make out of it, but I bought the whole remnant and took it home.  I started out by making the tote bag, and originally thought I would make a whole series of bags, but as holiday deadlines loomed and I had a solid 2 yards of fabric leftover, I decided to put it together in a big table cloth/blanket.

The tote bag pattern was so fun to make, I decided to buy specialty fabric and make bags for some of my other friends... one is a math tutor, one is a Zentangle teacher who loves otters.


 About a decade ago I made a quilted wall hanging for my bedroom, using a technique called "Stack N Whack".  The technique creates a kaleidoscope effect in the printed fabric.  When my sister saw my wall hanging she said she wanted one too.  I had actually pieced the top shortly after she had requested it, and I had intended to give it to her for Christmas that year - 2012 - however due to our move I had to pack the quilt top away.  It was buried among my unfinished project for years, unearthed last summer during my art room reorganization.  This fall I finished the quilting, binding, and sleeve for it in time to give it to her for Christmas.


Ornaments

When I found that my soldering iron needed to be replaced, I decided to pick up a multi-use tool, one that could also be used for wood burning.  Inspired by ideas on Pinterest, I decided to do a series of wood-burned ornaments as gifts and as my Bunco ornament.  


I started with a pile of wood discs, and a couple of designs... landscape and birch trees.

I penciled the designs on the discs, incorporating any interesting wood knots etc... 

After finishing the woodburning, I then painted features with slightly thinned white acrylic paint.


Most of these ornaments were given as gifts to friends and family.  I saved one of each design for my family.

Speaking of ornaments... this is officially the year where I amassed enough bird ornaments to have a whole tree dedicated to just birds.

I made this drum ornament to commemorate D's experience marching in the Santa Clara Vanguard Alumni Corp.  The original drum was red, I covered it with copper paper to match the drum he marched with.  The sticks are painted to match how his were taped for the performance.  The Vanguard star is made out of Shrinky Dink, which I punched with a large 8 point punch, then colored, then shrank.  I made the Aussie (hat) by taking a pattern for a toy's cowboy hat, I shrank the pattern to scale, then cut the pieces out of green felt and hand stitched it together.  The star on the side of the aussie is made from two sequins and a bead.  I painted the top of the drum head black, to match his marching drum, and the bottom reads "2017 SCVAC"


 Christmas Village

Having been so busy with gift projects this year, my village additions were not completed until after the New Year.  This year I painted the kids sledding on the hill, the ice house and ice salesman, and a little bridge.  The sled hill and ice house are the final larger pieces I have from the original set that I purchased about 15 years ago.  I have two sets of village people with some overlapping characters, so next year I will sort those out and probably just finish the people I haven't painted yet.  A couple years ago I came across another brand of unpainted village buildings that are the right scale for my village, though a slightly different style, so I'll begin adding those to my little town next year.


Wednesday, January 03, 2018

A new year, a new update

As per usual... once September hits and the Halloween costumes are complete, I tend to fall into the trap of "look how much time I have before Christmas!  I can make gifts for EVERYONE!"  I make a list of projects I want to make, I gather up supplies, I add ideas because I believe I have *so much time!*, and I put aside all personal projects in the blind belief that I can Make All The Things before the holiday deadlines.

This year was no different.  Although I will say that my initial list of projects was completed, thanks to having family come up just after Christmas, which gave me an extra couple of weeks for their gifts (normally I need to mail their stuff by mid-December).  I didn't have time to do extra projects beyond my initial list, but there is always next year.

In all the holiday hustle and bustle, some things fell by the wayside, including updating this blog.  As I still have a couple of gifts to deliver I'll be holding off on my Christmas Project update, but for now I can come up to speed with a couple of other creative endeavors I worked on over the last quarter of last year.

Sewing Projects:

October - my daughter's homecoming dress.  She had a very specific look she wanted, so I found a pattern and we headed off to the fabric store.  The skirt has an overlay of tulle - probably the most difficult "fabric" I've worked with.  The top has a black lace overlay which is difficult to see in the photo.

My daughter's Halloween costume: Blue from Blue's Clues!  I bought a pattern for a generic animal onesie (with the options of rabbit, bear, or cat) which originally had a separate headpiece that would velcro around the neck.  She didn't like the feel of that, so I altered the pattern by tracing the hood from one of her favorite sweatshirts.

I drew the pattern for the ears and tail free-hand on butcher paper, and hand-stitched the spots based on photos of Blue.  


Photography projects:
October:

 I made it to one of my pinhole group meetups, where we were photographing in a garden where we are technically not supposed to use tripods, as they believe it "detracts from the peace of the garden."  I can understand not taking up space on paths or pushing other garden viewers out of your frame, however I take issue with their reasoning.  I fail to see how me standing off to the side of a path quietly contemplating the view while counting down my pinhole exposure is "distracting" while other guests can walk through the gardens with their iPhone extended on a selfie stick, filming themselves with a loud, ongoing commentary.

As monopods are allowed in the garden, I compromised and borrowed my friend's hiking monopod.
This is not a tripod, it is a monopod with a built-in stabilizer. 

The following week I spent a couple hours in a different botanical garden, where tripods are allowed, and I captured enough images to make my 2018 calendar entirely from color pinhole images.

Also in October, my birthday present arrived!


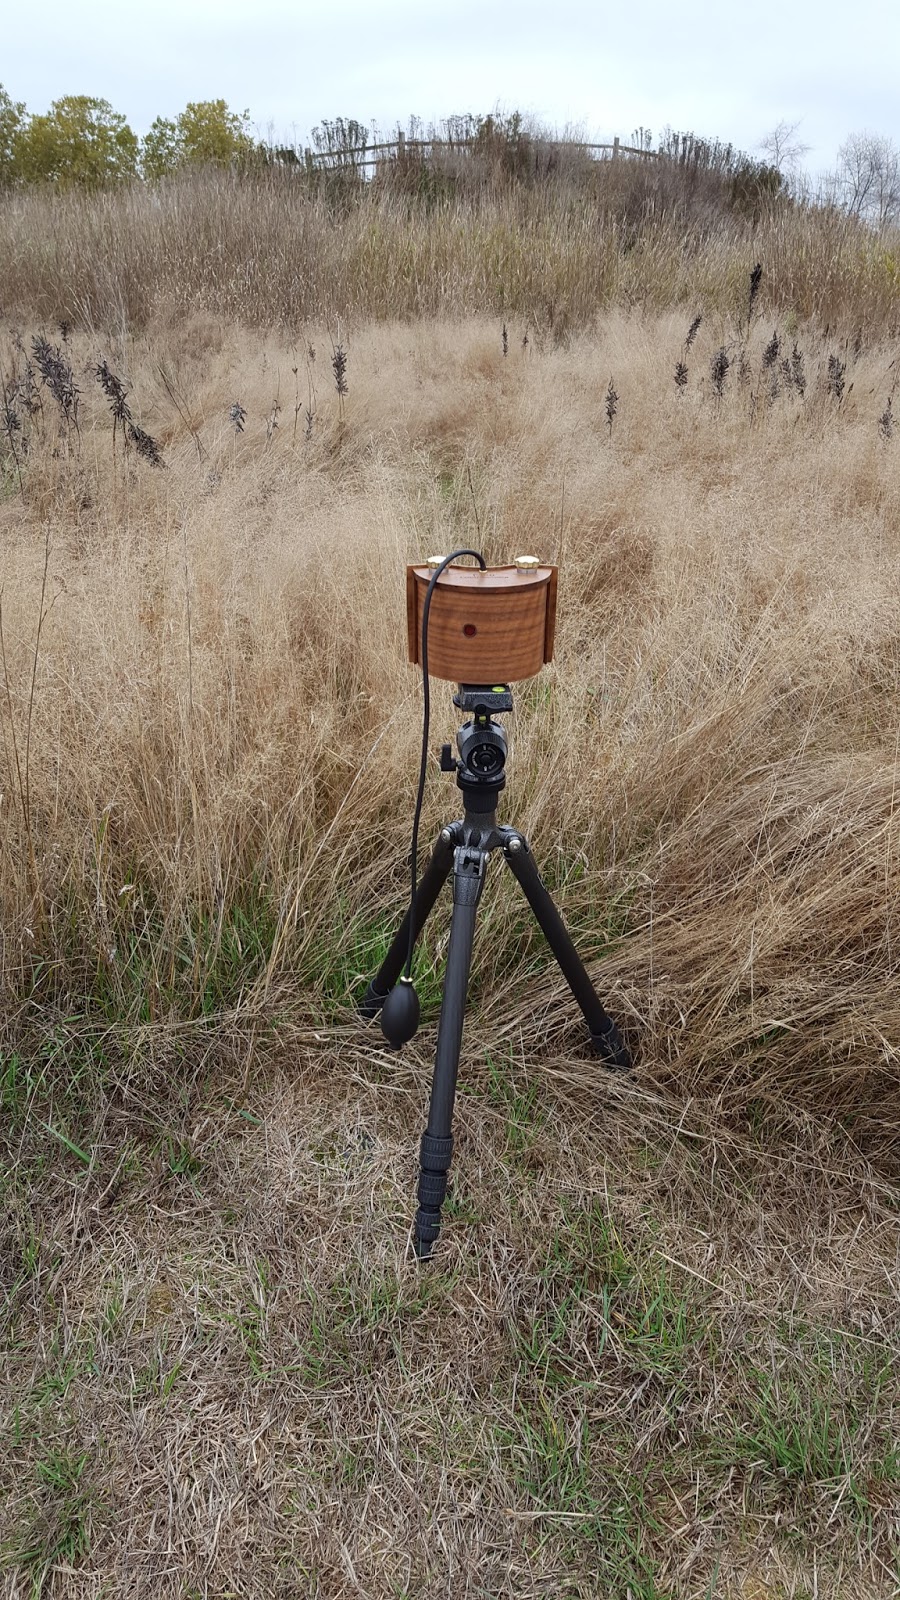
This beauty is a hand-made 120 degree pinhole camera.  The shutter construction is brilliant - squeeze the bulb to release the shutter with zero camera shake.  For long exposures, I hold my thumb over the end of the bulb and squeeze, and the shutter opens and stays open, then squeeze again to close it.
Thus far I have only taken it out to a local park for a couple of test B&W rolls.  I believe I have the exposure calculation figured, and it looks like I'm capturing about what I expect to capture in terms of framing.  My first couple rolls did have a weird "shadow" on the upper edge of the film, which I narrowed down to probably being a lack of tension on the film (it would show up on the first couple shots, but not the last couple)  Turning the knobs opposite each other to tighten the film for the first couple of frames seems to have resolved that.  
Here is a shot from my last test roll.

Unfortunately due to scheduling conflicts and weather I missed the last couple of pinhole group outings, and have yet to take this baby out for a real spin, but as I work through the post-holiday clean up/catch up, I'm keeping my eyes on the forecast.

  
Artsy Update:

Usually I spend some project time in December working on painting at least one piece for my Christmas village along with an ornament or two.  This year we traveled just before Christmas, which - while incredibly fun! - cut into my project time.  I devoted all free time to gifts and figured I could paint village pieces during the Christmas-New Years down time.  Then our house came down with bugs, so "down time" was truly down to just bundling up in front of the TV with mugs of hot tea.  Thus, I did not start my village work until New Year's Eve.  I'm hoping to be complete by Epiphany (still technically part of the Christmas season, right?)

The mug was one of my gifts from my daughter this year... it is actually helpful!  I've decided to paint 3 pieces for my village... kids sledding, the ice house (and ice salesman) and a little bridge.  The bridge will be painted to be similar to the actual bridge down the street from our house.

Lastly... I received a Pentel brush pen as a Christmas gift from a friend.  After loading the ink and testing a few movements, I did a quick sketch of a Great Blue Heron.

I love the way this brush moves, and the style of quick sketchy-lines I can make with it.  I'm thinking I'll be taking it in the field with me, when I have long pinhole exposures I'll sketch the parts of the scene that draw my attention, then I can compare the sketches to the actual images.

Friday, October 06, 2017

Falling into Fall

The weather has finally turned to normal Fall... chilly, dewy mornings, sometimes warm sunshine in the afternoons, and even some real rain here and there.  My brain is in full Fall mode, which means while I'm working on Fall items I'm looking ahead to Christmas projects - gathering ideas and supplies.  

My Super Secret Ornament project for D has been revealed to him, but now he wants me to make a bunch more for his friends, so I'm keeping the project offline until the whole thing is done and shipped out.  I'm happy to report, though, that his reaction was a literal jaw-drop (followed quickly by "how many more of these could you make?")

While at an outing to the State Fair, we came across a calligraphy demonstration.  I noticed the artist used a giant playing card to keep the oils from her hands off the surface of her paper, and also so that her hand would glide while writing.  I thought it was brilliant, so I took a picture to remember this trick for future drawing projects.


Halloween Decorations.  It may feel early, but I host a Halloween themed function in the first week of October, so Halloween is now a season in our house.  These are a few of the decorations, as I haven't taken photos of all of them yet.

Shelob - this year she is in full view of the front door so that trick-or-treaters can get a good look at her.

Aragog - the crate that my mystery gift arrive in is perfect for this one.

Guest Bathroom Infestation - Uhu wall tack and a couple bags of bugs makes for a fun effect!

Halloween Costume Complete!
I managed to make use of a good portion of my fabric stash.  I'd originally thought the wings would be more hodge-podge, but I had so much of the light and feathered fabrics that I had enough to make nice even rows.  I used my peaking sheers to cut the feathers and left them rough edged for a feathery effect.  The construction was much like a quilt... lay out the feathers on the base cape, determine the order, pick up the feathers and make small piles of each row... start with the bottom row and pin, stitch down the top of the feathers.... repeat until all the rows are down.  I did a loose hand stitch to attach the wings to the shirt (so that I can remove it later without damage to the shirt) and I tacked a few feathers around the neck of my shirt (which did not show in these photos, but perhaps I'll get a better shot on Halloween)  The beak is just felt, cut to the shape of my nose, and I used a glue dot to stick it to the bridge of my glasses.  I pinned my hair up in tufts - my goal was Great Horned Owl.  

Next up on my sewing table... a homecoming dress for G (which I'm not allowed to show until the night of Homecoming), then her Halloween costume, then I'm full on into Christmas gifts.  

On photography... I took an afternoon last week to shoot a couple rolls of color pinhole film at a wildlife refuge.  We hit it at high tide, which made for some fun reflections of gnarled tree trunks surrounded by water.  This weekend I have an outing to capture fall foliage with my pinhole group - I hope to roll some 620 spools so I can shoot with my Six-20, but my primary goal is the Graflex Pinhole to get enough shots for an entirely Pinhole calendar.  I'll get all that film back October 20th, which is also a day off, so with any luck I'll be happily scanning away that afternoon and evening.

With that... it's off to the sewing table!


Friday, September 22, 2017

Waskely Wabbit Holes

When I find myself distracted by a single thought that turns into an lengthy adventure (be it virtual, or in real life) I call it running down a rabbit hole.  In spite of our return to a regulated school schedule (or perhaps because of?) I found myself meandering down more than one rabbit hole in the past few weeks.

Project updates:

I have not taken as many notes as I thought I would on my garden this year, but I have drawn the general conclusion that I should stick with small variety tomatoes, and summer squash, and call it good.  I would rather have enough vegetables ripe at once to make a meal than one tomato, a tiny squash, and the beginning nubs of an eggplant.

Plus, if I stick to the basics of two plants, I have more space to try varieties and still have enough standards.  This is an indigo apple tomato, the vine only produced a few, but they were quite colorful to grow.

Rabbit Hole 1:  Missing Scissors
Having realized that there are situations where I could really use a project in my hands to make use of the time I'm spending when I'm somewhere I would rather not be, or someplace with a lot of waiting time on my hands... I decided to pull out a few ornament embroidery projects.  What should have been a quick 5 minute grab-and-pack turned into an hours long (not all at once, but stretched over a few days) search, because although I had two pair of embroidery scissors in my large tote, I wanted my blue handled embroidery scissors to carry in my purse with my portable projects.  I *just* reorganized my craft room last year, and it was really frustrating me to have "misplaced" my favorite and oldest embroidery scissors.  It was when I realized that my entire mini-sewing kit was missing that I had my breakthrough... clearly I left the mini sewing kit - with the scissors - with a recent project.


Another half an hour of searching finally revealed the sewing kit in my Zentangle drawer, which didn't make sense until I remembered that I had been embroidering Zentangle patterns on towels two years ago, and I packed the project in the tangle drawer instead of the sewing area.

Rabbit Hole #2:
G very innocently said to me one night "Hey mom, do you have that video of my first dance recital?"

It only took me about 10 minutes to find the low-quality versions of the videos backed up on my old external hard drive, then another 10 minutes to find the DVD's of all the dance recitals, but that lead me to thinking about the original tapes.  I still have our old camcorder in the closet so that I can "someday" do a digital backup of our tapes.  I decided to look at the tapes in the camcorder case, that's when I realized they were not *in* the camcorder case.  (the memory I had of tapes in the case were of the blank tapes I used to keep with the camera when we used it for recording)    After searching all our movie storage areas I made myself a cup of tea and sat down, and thought... where did I used to keep the Hi8 tapes?  On the shelf with the CD's... we don't have the CD's out anymore because we use digital streaming for music... so the CD's are in those clear boxes in the attic... which is where the tapes were as well!  That portion of the rabbit hole was a relatively short journey...

...but then I spent some time researching how to transfer the tapes to my computer.  I took this photo of the camcorder plugs for a discussion with a friend, who was able to point me in the directly of an inexpensive video capture device, which I now own, and have tested, and it works.

Not that I have time to transfer my movies to digital at the moment, but at least I have the technology.  Hopefully I'll get around to getting this done before the technology changes again.


Rabbit Hole #3

Halloween Costume.  
I needed some brown fabric from my fabric stash, which lead to me realizing that my fat quarters and felt were split among too many boxes of fabric, and I had also held onto some baby flannel for more than 16 years without using it, and if I ever make another baby quilt I'm likely to buy fresh fabric anyway...

...so I spent some time over last weekend sorting and purging my fabric stash, and getting it down to the point where it fits in my existing boxes, with a little room to spare.

In between the rabbit holes, I pulled my big tote out and set back to work on my bird quilt.  My 4 bluebird squares are done, I'm now working on the intricate Bobwhites.


A teeny tiny preview of my Halloween costume.  I have made great progress on the design and most of the cutting was completed last night.  

I will do a full write up of the process with photos of the end result once it is complete.

Rabbit Hole #4
Film photography.
We are considering a vacation out of the country, which means I'll probably not want to pack my Graflex due to it's size and weight, which lead me to poke around online for a light weight medium format pinhole camera.  Holga used to make one, but as they are discontinued the cost of a new "collecters" item is outrageous.  I did notice online that some people made mods to convert regular Holgas to pinhole, and I have an extra Holga with a broken shutter, so I briefly considered that option... only to set it aside because that old Holga doesn't have a tripod thread.  So then I looked at my newer Holga to see if it had a tripod thread...

...which is when I discovered I loaded film in it about 5 years ago and haven't finished the roll.  So... another camera to toss in my bag for the next outing.

As to the lightweight pinhole option... I will likely bring the 35mm panoramic pinhole, and I'll see if the new 120 panoramic camera (which is currently in production) might be light enough to carry.  If it feels too heavy for international travel then I might look into the Diana pinhole, or something from the Schlaboratory.  

On film photography...

My E-6 came back slightly underexposed, but still totally usable.  I'm hoping to get another outing in this week that should give me more varied subjects to shoot at a leisurely pace.

Ebey's Landing, Velvia 50, Graflex Pinhole

Friday, September 01, 2017

Projecting Projects

Although I knew about the expected eclipse on August 21 (it was partial here, about 94% coverage) I had not made plans for it due to the inundation of prepping for our travels.  I figured I might pick up viewing glasses at a local store at some point, but didn't write it down, so I didn't get out before the glasses were gone.  As a result, I spent a little time on the 20th creating different eclipse projectors based on the instructions for NASA.

I actually had a fun time playing with boxes, tape, and foil... I made several sizes so that we could test each one and decide which combination of box/hole size worked the best.  I discovered that the smaller the box, the smaller the hole needed to be in order to get a sharp image.  Also, while the largest box made the largest projection, it was also further away from our eyes.  

In the end, the cereal box was everyone's favorite.


We had meandered down to the lake to watch the eclipse and came across some natural eclipse projections along the way.  Also, our neighbors shared their viewing glasses with us, so we were all able to view the eclipse in various ways.  It made for a fun science filled morning.


I've been listening to the Film Photography Project podcast while working, which sometimes will prompt/inspire/instigate me to dig around in my gear and look at my old gear.  My most recent digging brought out my Polaroid Land camera, which uses pack peel-apart film.  I hadn't realized that I still had several boxes of no-longer-manufactured Polaroid film, which can be used for emulsion lifts.  Fuji makes* replacement pack film, but their emulsion lifts like a plastic transparency, rather than a gooey emulsion that adheres the way Polaroid does.
*thinking about emulsion lifts led me down a rabbit hole on the internet where I discovered that Fuji has also stopped making pack film, and the Impossible Project has no plans to re-make pack film, but I found an online darkroom supply store that apparently plans on remaking the pack film.  I wrote to them to ask about it, they say they are "still on it".  So, fingers are crossed that my camera will not become entirely obsolete after I finish my current film packs.

Scrapbooking!  I made progress!  Significant progress!  I'm all the way up to mid-November 2004 in the ephemera album and cruising!


More film photography! 
As I see that we are on the brink of a weather turn, I thought it would be nice to take advantage of the still-warm summer days and have a family outing.  We all needed the fresh air and change of pace, I think.  I did some reading and researching and found a location that was a ferry ride away (which feels like a mini-vacation) had minimal parking and facilities (which means less crowds) and lovely views on Puget Sound.  As I wandered the length of the beach working pinhole scenes, D meandered around taking some photos of his own (and discovering hidden pieces of art along the trail) while G kept herself occupied playing with her own camera and her guitar.  
Shot with my Graflex Pinhole, 3 second exposure, Ilford Delta 100

I came away from the outing with 2 rolls of 120 B&W, 2 rolls of 120 E-6, and one roll of 35mm panoramic B&W.  While I want to concentrate on larger format, I have a drawer full of 35mm film that needs to be used or tossed, and considering the variety of cameras I have to play with... it seems a waste to toss it.  So I've resolved to take a 35mm camera with me just about everywhere I go.
As for my shooting, the B&W looks to be properly exposed and developed, although I'm still getting some strange grains on my film every so often (not every frame, just once in a while)  My E-6 is off to the lab and I will pick that up next week.  My fingers are crossed on that, because although I did calculate the reciprocity correctly this time, my lightmeter was set to 100 instead of 50 for the initial exposures.  However, ISO 50 reading was only about a half second off ISO100, and every exposure was a guesstimate 2-3 seconds, so it's not precisely scientific anyway.  

My super-secret project is coming along, I've made it past a couple of roadblocks and set aside a couple of ideas that are just not panning out.  My plan is to get those completed soon so that I can then concentrate on my Halloween costume.