Saturday, February 20, 2016

Little Pink Houses for you and me

In my ongoing endeavor to "use ALL the craft supplies I've accumulated", I spent my last few weeks of crafty time working on my little chipboard house kits.


I purchased these kits a couple of years ago with the intention of making wee-little house Christmas ornaments.  In fact, they have hangers built into their chimneys for just such a purpose.  I found, though, that my numerous attempts to work on them during the winter would generally end in frustrating creative roadblocks.  The construction of the houses involved a lot of sit-and-hold-while-glue-dries, the designs never seemed to come together smoothly, and the results didn't pan out to look anything like the original concept I'd had in my head (as vague as it was to begin with). For me, the collage process involves a lot of "walk away and think about it", so perhaps Christmas is not the season for me to do collages in the first place. After the winter holidays came to a close, I turned to Pinterest for inspiration on Putz houses - traditional little cardboard house villages, which are usually covered in glitter, and generally put out at Christmas time, although I did find some themed for Easter.  After the relative success of my altered tins, and remembering that I did complete one spring themed house last year, I thought I would apply the spring theme to the rest of my little Putzy houses.

I now have a wee village (which will grow by one house once I get the rest of the Easter decorations out of the attic)

The pink farm house was the first, and most frustrating, house to start with... frustrating only in that it was already assembled, but painted dark red and brown and I wasn't fond of how it looked at all.  I repainted this house 3 times before I was satisfied with the color combination.  The addition of window frames, a little flower garden, and a coating of the traditional Putz glitter finally finished this 2-year old project.

Bonus: finally using the little flower tabs my mom handed down to me.

With that success under my belt, I began digging through my paper stash, putting together color combinations, and picking out inhabitants for my little village.  The map house came together quickly, as did the purple bird house.  The tall gnome house gave me a little trouble, as I'd picked a nice realistic looking clover for the ground, and the swirly red for the roof, so the house needed to be dark... however none of my blue monochrome papers looked quite right.  I set it aside for a couple days, then finally came across the bold stripes which seem to be just the right amount of dark and light to work.

I found that mod-podging all the pieces before assembly made for much easier work.  I also gave up on my regular glue and attempted both double-stick tape and hot glue for the house assembly.  The double-stick tape generally held the first couple houses together well, although one roof was not perfectly lined up, and so part of it kept popping up. so I eventually fixed it with hot glue.  Also, the wee fences would not hold with tape at all, so those were fixed with hot glue as well. Hot glue held everything well, but is not very forgiving if you don't line it up right, and also has the possibility of burnt fingertips, so I would practice putting the pieces together a few times prior to applying the glue.  That seemed to do the trick, and the few extra globs (which seem to be inevitable with hot glue) were easily removed with my xacto knife.

My favorites are my little church, and the red gnome house.

This bird paper pack is among my favorite in my whole stash, and a bird themed church is appropriate for me.

I love the raindrop paper on this roof, and the flags on the fence, such a cheerful little gnome house!

Wednesday, February 10, 2016

First (completed) Altered Tins

Among the many started-but-didn't-have-time-to-finish projects from our latest Christmas season was the altered tin idea.  I came across the mini-dioramas on Pinterest (of course) and given the surplus of holiday related paper and ephemera which abound in my art room, plus my affinity for a particular brand of mint, it seemed like a creative win-win to embark upon this endeavor.  Although I started several tins, I ran out of project time prior to the end of the holidays, and the partially prepped tins now reside in the Christmas supply box until next fall.  Easter, however, is right around the corner, and I've no shortage of tiny mint tins, so I was inspired to give the altered-tin project a whirl in a more springy theme.

Collage work is somewhat of a slow process for me.  The cutting and gluing doesn't take time, but the pawing through papers, deciding on color schemes, finding inspiration from objects, and time to dry between paint layers makes for a project that needs some space to breathe on the table between bursts of energy.  As a result, I tend to work on 2 or 3 small collages at once, painting one while the mod podge on another dries, etc...

Here are the tins I start with:
 
(The vermints are my favorite kind)
They have a glossy exterior, so I begin by roughing up the surface with a little sand paper so that the mediums I work with will adhere better.  On this go-around, I also discovered that the lids can be completely removed and then later reattached (at least on the vermints tins, I haven't tried the Newman's Own one yet)  This made sanding, painting, and gluing quite a lot easier to manage.  

After prepping the tins, I began to go through my many boxes of various supplies looking for papers, trims, and dimensional objects to fit the general springy ideas.  I rarely have a specific end image in mind when I begin, I let the collage evolve through the process based on what supplies jump out at me.  Sometimes I begin in one direction and then turn around entirely partway through.

In the midst of the project, I gather supplies and dry-fit the bits before gluing anything down.  In this instance I'd started with a somewhat pink/green tin for one, but it just didn't look quite right with the papers I'd picked for the inside.  I was eventually inspired by some newsprint-looking tissue paper in my stash, and changed the whole exterior to a neutral beige

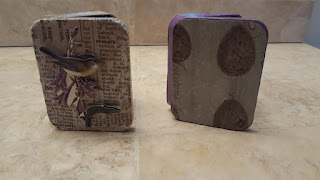
Here are the exteriors of my first finished tins
And here are the interiors:

The one on the left began with the fairy paper, and grew from there.  The one on the right started with the "Phogotraphy Studio" and my little owl French feve.  Though these were originally meant to be Easter/spring decorations, I think the photographer studio tin will wind up having a year-round home on my mini-art shelves by my kitchen sink.


Tuesday, February 09, 2016

Birding Walk

Though the temperature was cold enough to see my breath this morning, the skies dawned clear blue and I opted out of training at the gym in favor of going for a long walk around my neighborhood.  I'm fortunate to live in an area surrounded by woodlands with maintained trails, and I've navigated a nice 4 mile loop that is a nice combination of neighborhood walking and wetland/wooded trails.  It is not uncommon to see birds of prey in the area (haws and bald eagles are frequent fliers) so I've decided to start carrying my DSLR on my walks.  Unfortunately I don't have a compact case which can house my 300mm prime, so today I took my 55-300 compact zoom.  While it is handy and lightweight, the focus at 300mm seems questionable, putting a hazy glow around pretty much anything bright (and I'm now reminded of why I stopped using it). It is decent enough to record birds for this morning, and I'll attempt to clean both ends of the lens (maybe it is just coated with something?) but if the focus doesn't improve I might retire the lens and just take the superior 50-135.  It is heavier and not as much zoom, but especially with bird ID, I really need the clarity.

On to the birds!  Although I've walked this loop many times, I was surprised by the number of birds I was able to identify when I simply took the time to pay close attention. 

Terrible photo, but these are two of the 4 shy little buffleheads who frequent the lake near my house.  They dive and swim away as soon as anyone stops on the trail, hence the distant fuzzy shot.

I found several ducks floating in a water retention pond near a busy road.  Thanks to the road noise, and a chainlink fence, they didn't seem bothered by my stopping.
These are a couple of Hooded Mergansers

Here I captured a Bufflehead on the left, several Ring-Necked ducks in the center, and the Hooded Mergansers on the right.

There was also a pair of Mallards hanging out (upper left corner)  I attempted to get all the ducks in one shot, however framing was difficult due to shooting through a chainlink fence.

On a dirt trail running along a creek/watershed area, I found this Song Sparrow.  He sat still long enough for me to pull out my cell phone to shoot a video, put my cell phone away, pull the DSLR out of my camera bag, and take a couple of photos.  He was a very patient bird!


Along the pipeline trail, listening to the distant calls of crows, I stopped short when I heard a familiar "thunk-thunk-thunk" sound... this Pileated was on a tree just a few feet from the trail.  She hid behind the tree while I pulled out my camera, and kept peeking around waiting to see if I was advancing.  When she decided I wasn't coming closer, she resumed her feast on the side of the tree.  She left when a couple of women passing by stopped to see what I was pointing my camera at.

Outside of these birds, I also heard several hummingbirds chipping loudly, and spotted crows, wrens, juncos, and black-capped chickadees (though I did not walk with my camera out, so I missed those photo ops)

Thursday, February 04, 2016

First Konstruktor Test

This week I had to make a run out to the airport, so I took some time on my return drive to stop off at a local botanical garden to test my recently built Konstruktor 35mm camera.


Outside of my initial troubles with the film advance knob during building, the use of the camera is fairly straight forward.  Open the view box on the top, flip the internal mirror up to see through the lens (lever located by the lens), choose your exposure (Normal or Bulb) compose, focus, press the shutter release button (on the top) advance the film.

I like the way the view box is constructed.  Each component has a little tab to use to flip it up, and they lock together to hold the viewbox open.  There is even a tiny magnifying glass built into the top  that you can use for closer viewing, however without flipping that up it is possible to hold the camera at your waist to compose and focus.  The mirror is pretty bright, once it is flipped up.  (most of the time it took several attempts with the mirror lever to get the mirror to stay put)

I also decided to load one (probably final) roll of film into my TLR to do a final "tape every inch of the door" light leak test.

The camera is upside down here, I taped over the bottom hinge.
Taped all the way around the bottom.
Tapes all around the edge of the back "door" where I load the film.  (the note on the back is because the viewer is so hard to see through that I had to remind myself where to put the lens when focusing)

While I was out, I frequently stood in the sunshine and turned both cameras over, allowing the sunlight to hit it at every angle, both with the viewfinders open and closed.  I had planned on shooting the exact same shots, from different angles, using the two cameras, however about 3 frames in, my TLR's shutter (to add insult to injury) started defiantly sticking.  Perhaps it was jealous that I took another film camera out in the field.  Or it is just tempermental.  In any case, I didn't bother to scan most of the frames as they are mostly overexposed and blurry from camera movement with a long shutter.

And there is the whole "light leak" problem that clearly did not disappear
I scanned the adjacent gap between frames to show the red streak that has plagued so many of my rolls of film.  The leak is either from the viewfinder being open in the sun, or from light reflecting inside the film box when I shoot with the sun to my right.  In any case, I just can't reliably use this camera in daylight, add to that the sometimes-sticking-shutter and the TLR is officially retired to my shelf of "I can't shoot with them but aren't they pretty?" cameras.

On to the successful part of the day, the Konstruktor!

First of all... NO LIGHT LEAKS (so far)  With no special taping, and with keeping the viewfinder open and turning the camera this way and that in the sunshine, I saw no evidence of light reflection or light leaks on any parts of my film.  It is such a relief!

As for the image quality, I do enjoy the nostalgic feel of the plastic lens and film combination.  The focus seems to be fairly accurate with what I saw in the viewfinder (though the viewfinder seems to be sharper than the resulting image)  I like the vignetting that I get from the lens, and I *love* that the film advance knob stops after each frame, so I'm not wasting film over-rolling or overlapping shots by under-rolling.

Here are some of my images from the botanical gardens
This is a meadow along the trail... testing the infinity focal length.

Here are ferns growing out the side of a tree trunk, testing the .5m focal length.  It looks like I get some depth of field on this setting


This is probably my favorite shot on the roll, again testing the .5m focal length

This was set to infinity... the little brown streak in the air near the center/bottom is actually a juvenile bald eagle riding thermals... I did curse under my breath for my decision to leave the big DSLR and lens at home, but this was only meant to be a quick stop to test the film camera. Still... birds!

This was an intentional double exposure

This was an accidental double exposure.  I'm not sure if I forgot to advance the film or if I hit the button accidentally while pulling the camera from its case.  

The next thing to test will be the bulb setting, and the challenge will be to remember to advance the film after each shot.

Monday, February 01, 2016

Konstrukting the Konstruktor

Ever since I was introduced to the Holga back in early 2000, I've enjoyed playing with lo-fi photography (or, lomography)  The quirkiness of each individual plastic lens and camera body makes for unique and sometimes surprising images, and working with film reminds me to slow my shooting process down, and take care with the limited amount of frames I have to work with on a given roll.  I've gone through several Holgas over the years, built a pinhole camera from a cardboard punch-out kit, and tried a few funky fisheye and extra-wide-angle plastic cameras just for fun.

Several years ago, I built a home made twin lens reflex camera from a kit that D bought for me.  Since then, the little black box has accompanied me on many adventures, producing unique images with a nostalgic feel.  The last few times I've brought it out, however, I've had an increasingly frustrating battle with red streaks across multiple frames of my film. While I understand that light leaks are "part of the personality" of a plastic camera, I really wanted cleaner shots... and I have spent a lot of time experimenting and running rolls of film, spreading gaffer tape over every crack and crevice that could possibly affect the film box to the point where the camera exterior was more tape than plastic.  I *thought* I had it beat....

...then I picked up my 2 rolls from my last trip, and it was filled with more "light leak" streaks that I've encountered yet with this camera.  I recall the sun's location when I was shooting the worst of the streaked shots, and I know that I had my camera inside my bag at all times outside of when I took it out to make a shot (in order to minimize potential exposure) so I've come to the conclusion that these are not leaks from the camera back.  The interior of the film box is quite shiny, and it looks as though I'm getting some kind of reflection from the front of the camera (in horror films, this would equate to "the call is coming from inside the house!")  It seems to happen in bright light when the sun is to my right, the angle seems to make the sun reflect off the interior when the shutter is released.

Coincidentally, I'd been eyeing the Konstruktor lomo kit for quite some time, but had held off buying it for myself because I rarely carry two kit cameras with me on any given trip.  Building another kit would require me to decide which camera I wanted to take with me, and I wasn't sure I was ready to give up on the TLR entirely.  The plethora of red streaks on my latest film helped nudge me in the direction of New Toy, and so, inspired by frustration, I clicked away and bought a Konstruktor.

The box says "build in 1-2 hours" which is initially true.  However as with other kit cameras, the instructions are somewhat minimal (more like pictures in a Lego set than instructions) Here is the initial build in high speed:


What I did not show in the video, however, was the first time I loaded the film and found that the film advance knob was locked up.  Admittedly, I had forgotten one gear for that part, and that was my first "take apart and rebuild" attempt, but the knob kept locking even with the proper gear in place.  I searched online, but could not find anybody else with the same problem, though I did find one person who suggested spinning the film take-up clockwise (even though the instructions, every other video, AND the camera's direction arrow clearly point counter-clockwise)  Clockwise didn't work either.  After much rebuilding and testing on my own with the back out of the camera, I concluded that two wheels needed to move together, and the "film counter" disc in between was preventing that from happening.  Every review online said that the film counter was not accurate, and my TLR never had a film counter anyway, so I opted to remove it... which seems to have resolved the sticking issue.

Stickers on to personalize the camera, and I have my new toy:


I have loaded film for testing, so fingers are crossed that I've built it correctly.  I plan to take it out in bright conditions if possible to check for light leaks (aka "personality") and will go from there.

The mystery of my TLR does still bother me.  I have poked and prodded and removed lenses and tested it with a flashlight and the red streaks still make no sense.  I seal Every. Single. Seam. with gaffer tape and still end up with streaks.  I am tempted to load one last roll in the TLR and shoot alongside the Konstruktor, in the same conditions, and maybe even wave it around in bright light just to see if it really is an internal issue.  This is one downside to the TLR as compared to the Konstruktor... the TLR doesn't come apart quite as easily and so unbuilding/rebuilding is not much of an option.  I admit, I'm tempted to start another TLR from scratch as well, but I think I'll do one last test on my current one instead.  Maybe I forgot one crucial piece of tape last time I was out.... just to ensure I'm not going crazy, I'll take pictures of it with my cell phone so I *know* for sure what is taped shut.