Friday, October 05, 2012

Falling Forward - late season boating adventures

September is a month of new routine combined with work chaos for me.  While I set and settle into the new school year hours and after school activity schedules I must simultaneously scramble with my job to complete the end of the fiscal year paperwork.  As of today my final files are delivered for work, back-to-school conferences are done, art docent training is complete, and I have about 9 months of "regular schedule" laid out before me.

Ahhh... October.

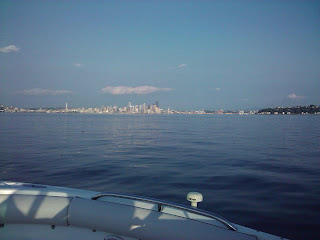
Our September has been very unusually dry (I think we only had one day of rain the whole month!) so we have been taking advantage of the sunny days and mild temperatures and enjoying some fresh air and elbow room.  A couple weekends ago we were wandering around Seattle and decided the weather was so nice we should take the boat out onto Puget Sound.  It was a spontaneous decision, so I unfortunately did not have my camera gear on me, but it was a lovely ride over calm waters.  We grabbed a few snacks at the little store in the marina, got out into the bay and crossed over the "traffic lane" to Bainbridge Island.  There we started seeing dorsal fins pop out of the water, and quickly realized we were surrounded by a pod of small porpoises.  D cut the engine and we floated off shore for a bit, watching for fins and listening to the sound of their spray as they came up for air around us.  After a bit of a pause in the ride, we continued on and circumnavigated Bainbridge while we watched the sunset over the horizon.  The next day dawned fair and sunny, so after a lovely yoga class we stopped at the store for supplies and headed back out to the marina.  D looked over some maps and did a little math and decided we should head towards Port Townsend and see how far north we could get before we'd have to turn around.  We were surprised to find that even with a couple of slow downs for a lunch picnic and navigation through a narrow, shallow channel... we were able to get to Port Townsend in just about 2 hours.  We found space at a public dock, pulled up, and had the great pleasure of walking to our favorite coffee shop for a cup of coffee and dessert.  It was slightly surreal to arrive by water, but we enjoyed it greatly.  Our return trip was on the chilly side - as sunny as the day was, dusk brought the chill over the water.  On our way back we slowed to navigate a narrow channel and we found a flock of sea birds in a great pod just ahead of us.  D slowed the boat to a crawl so that I could attempt a few pictures.  He took a picture of me taking a picture of the birds.
I was very happy about the warm light from the setting sun, however as calm as the water appears to be, it was actually quite bumpy which made focusing on moving targets extremely difficult.
Taken with my cell phone... the rest of the trip was a race against the sunset - I did not want to navigate through ferry traffic in the dark!


We are already talking about boating to Port Townsend next year, making reservations for a spot in the marina and enjoying some fishing or whale watching.

I've surprised myself with my ability to be out on the Sound in our open bow boat.  I love being near water, hearing it's movement, feeling the pulse of waves on the shore, listening to the trickling creek or the rush of a waterfall.  Being on or in the water is something else entirely.  When we first bought the boat I was dead set against going onto the Sound... from shore the Sound looks like open ocean to me, and it is plenty deep and extremely cold water.   It has been a gradual journey to go from Lake Sammamish to Lake Washington to the open waters of the Sound.  Sammamish was small and comfortable, but the docks were in terrible shape, always overcrowded, and required me to back up the trailer (which I am just not skilled at doing).  Lake Washington was much easier to launch and pull out of, but very busy with waterskiers and packed with sail boats and kayakers in Lake Union.  Although the Sound is deep and cold and wavy, it has breathing space, and the convenience of a marina so we no longer have to go through the tedious task of launching and loading every single time we want to be on the water.  The marina itself is an incredibly peaceful place for me to be... the wind blows through the tall masts of the sailboats, there are always heron and ducks and kingfishers meandering about, and the occasional harbor seal will glide around spying on us from a distance.  Heading out of the marina, we have a complete view of Seattle and Elliott Bay.  My cell phone's camera lens does not do it justice.

It has taken a lot of time, and practice, and deep breathing but I am slowly gaining better control over my panic attacks, and I'm finding that I not only "deal with" being on the Sound, but I actually look forward to it with great enthusiasm.  My only main concern now is when we cross the "traffic lane" - the center of the Sound where all the giant barges and cruise ships pass through, leaving massive undulating wakes in their path.  D has become quite skilled in boating over the wakes - depending on the speed he will even angle the boat so that we surf along the crest of a wake until the waves die down.  If we are near shore and puttering at low speed I can almost relax entirely, but when we are out in open water at full speed I will wear my life vest for extra peace of mind, and usually have a white-knuckled grip on the windshield.  Technically our boat is designed to go 40 miles out into the ocean for tuna fishing, so short of a tsunami I don't believe anything in the Sound would ever tip it.  Logic just doesn't penetrate panic, so I have to learn to breathe through it and talk myself down in my head.

It's a bit ironic that I find it so relaxing to be someplace that causes me to have panic attacks, but in the end it's the sound and smell of the water and the view of the wildlife that wins.

Tuesday, September 04, 2012

Bird Paparazzi

Thank you to everyone who helped offer words of advice/support/suggestions/etc... in my quest to narrow down my entry to the Audubon Society's bird photo contest :)  Having multiple sets of fresh eyes on my work helped me a great deal in shaving my selection down to the maximum 10 entries.

...then I found a most friendly and relatively fearless Pileated Woodpecker frequenting my feeders and I kept on my obsessive shooting ways, which added a few new photos to the mix.

In the end, after a great deal of consideration, re-editing, and mulling things over, here are the 10 shots I decided to submit to the Audubon Society:

Barred Owl (A sentimental favorite of mine)

Bittern's Lunch (Of the entire series, my favorite due to the fantastic view of the frog)

Heron in Flight (This shot goes to show how much you can change the mood of an image with a little cropping)

Dancing Crow (I truly think crows are overlooked as being so common, but they are such amazingly clever creatures, they are a joy to watch) 

Baby Juncos (Can't. Resist. Cute. Fluffy.) 

Vacationing (Juvenile Yellow Crowned Night Heron - I love his piercing red eye) 

Pileated Photobomb - (The angle of this shot will forever crack me up - "whatcha doin?  Oh, is that a camrea?") 

Keeping a Watchful Eye (Woody - the male - watches across the yard while Wilma - the female - grooms her feathers) 

Curious Pileated (This is Jr.  He would often pause from eating to watch me and my camera lens, then go back to eating) 

Mother's Nest - (Red billed streamertail female on her nest in the gardens of a resort in Jamaica.  The nest is completely out in the open in a high traffic part of the garden, yet tough to see if she is not sitting on it - I was actually standing on the walking path outside the hotel's kitchen... that brown wall in the background is the door to the office.)

This project has helped me to realize just how many bird photos I've managed to collect over the years... I am now contemplating making my 2013 calendar entirely out of bird photos.  Hell, I could probably make an entire calendar just on pileated shots!

Friday, August 31, 2012

Long Overdue...

I know I am long overdue for an update, and sometime in the next month I'll be able to explain away my absence... (some of it has to do with intermittent lack of internet access over the last week - that issue has been resolved for now!)

But for the time being... I can at least make an announcement and share a pretty picture. :)

Last spring I entered Island Magazine's photo contest (theme: depict island life)  I poured over my collection of images, studied previous year's winners, poured over my collection again... and submitted my most favorite group of photos which I felt showed Island life as I see it.  A few months later, I received word that one of my images made honorable mention in the contest!  Then two days later I received paperwork telling me not to announce it anywhere until the magazine posted *all* the winners... hence the extreme delay in finally sharing!

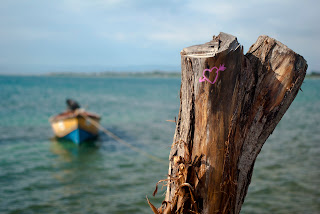
My Honorable Mention Photo:


This photo was taken at the end of the dock of the Pelican Bar, which resides 2 miles off the southern coast of Jamaica, just outside of Treasure Beach.  The bar itself is made entirely of driftwood, and is built on a sand bar seemingly in the middle of the ocean.  In reality, the area just around the bar is only about 3 feet deep, which is perfect for snorkeling (however one must travel by canoe from the shore over the deeper part of the bay to reach the sand bar) The dock stretches out the back door of the bar, and is a great place to lay out in the sun and enjoy a beer after a bit of snorkeling.  This is taken from the end of the dock, looking back to the shore where we'd boated over from.  I didn't paint the heart on the drift wood, that was there already :)  Many people who come to the Pelican Bar carve their name on a piece of wood or leave behind some memorabilia, making the interior of the bar an eclectic guest book.

For reference, here is another shot I took that day, standing in the same spot... I simply turned around to look back up the dock.  This was a rare moment between boatloads of tourists, when the dock was empty and you can just see our friend Tyrone inside the door eating lunch.


The Islands Magazine competition was stiff, and I'm honored to be named along with so many other great images.  You can see see all the great honorable mentions and winners on Island Magazine's Photo Page.  (I'm also excited to see they use a portion of my image for their front page collage!)

Saturday, July 14, 2012

Bird is the Word

I think my lack of posting for 2 months has probably eliminated what little audience I had left here... but I'm resurrecting and pressing on anyway.

(Does that make this a zombie blog?)

Audubon Society has a bird photography contest going on... the deadline is end of August so I have some time to prepare.  When I saw that we could enter up to 10 photos I wondered if I would have enough decent images to complete a whole entry.  Then I dug through my backlog of photo files and realized just how often my lens' attention is turned to birds.

After reading carefully through the rules (no "captive" photos allowed - meaning, no zoo shots) and cutting out any shots that included bird feeders (technically those are not "captive" shots, but they don't exactly look wild either) I have narrowed my selections down to the low-low number of...

52.

Editing down any further has been a harder process than I'd imagined.  Many of the shots are exciting to me simply because of my own interest of particular species, but that doesn't mean the shot themselves are spectacular.  Some are shots I find somewhat boring because they were shot in my back yard, yet others really like them for the framing and subject.  Some of the shots are the same image cropped differently, some are the same subject from different angles, and I can't decide which I like better.  

So I have collected the 52 images into an album online... and I welcome any thoughts, critiques, ideas, insight, lists of favorites or any other comments anyone might have to help me narrow this down to the top 10 images.

Monday, April 30, 2012

All Tangled Up

A couple weeks back I followed a post by NPR linking to a fantastic mathematics doodling video.  (I vote that all her math doodle videos are must-see, but my favorite is the one about circles and snakes... probably mostly because it is rich with puns)
Those videos reminded me of the Zentangle books.  Technically I picked these books up for G last year, thinking she would enjoy the step-by-step doodling instructions.  Though she looked through them at first, they eventually made their way into her collection of "how to draw" books...
...until a couple weeks ago, when I stole them.

Zentangle is a fantastically wonderful way to learn doodle patterns - one movement at a time - until they combine to form larger abstract work.  The idea is to go at it free-form... no set plan, no "over thinking" your design.  In other words... pick up the pen and just keep swimming.  It takes the frustration of a "perfect end product" out of the equation, and instead focuses on the joy of the process.

Given how oppressive my month of April has been, this is precisely what I needed.

I grabbed a small drawing pad out of my stash of paper, a retractable Sharpie, and began.

Sometimes I would doodle in between difficult work tasks.  Sometimes I doodled while watching TV.  There were nights were sleep evaded me, and I sat up to finish a pattern or two.  I started bringing the pad with me when we went out, and I would scribble away while waiting for food at the restaurant.  I googled "zentangle" and found a world of patterns and instructions in both video form and written... which opens up the world of exploration immensely.

My very first attempt turned into a Birthday card, which I mailed out without having scanned it... my next three attempts are here:


D looked over my shoulder at my doodling one night, then drove us over to the art store to buy me a set of "real" pens (of varying sizes for greater shading options)  

What I love the most about this is just how soothing it is, to lay out repetitive patterns and add smaller details without worrying about perfection in the end result.  It is a series of smaller projects requiring hardly any supplies, it is easily portable, and can be incorporated into just about all of my other creative hobbies. I'm now working on what will probably eventually be a dimensional project, though I'm not setting my sights too strictly on the end destination.

I'm just going to enjoy the journey.


Monday, April 09, 2012

Eggless Easter Eggs of the Felted Sort

This year's experiment in egg decorating was inspired by my friend H's post about some beautiful wool rovings.... I've always wanted to try needle felting (and frankly needed an excuse to by a box of pretty pretty colors) so I did a little searching around and found out that needle felting eggs is really quite simple.

Get a styrofoam egg.

Wrap it in some wool roving.

Get a felting needle and stab the bajeezus out of it until it sticks.

This is not only a great opportunity to experiment with pretty colors, patterns and pictures, but it is one heck of a stress reliever.  G always enjoys new craft opportunities and jumped right in, however I was pleasantly surprised when also D picked up a needle and worked his creative magic.  Together we felted over a dozen colorful Easter Eggs... so much fun!

Friday, April 06, 2012

What happened to March?

I lost count of how many times in the last few weeks that I thought about doing an update. Unfortunately, my work life exploded with activity and overran my days and nights for much of March.  The sudden barrage of demands did not just attack my time, but my energy... it took so much of me to slog my way through the muck that by the time I'd reach the other side of things I simply didn't have a coherent blog-worthy thought to share.  My true introverted nature turned to retreating to recharge - books to escape into, art projects to distract my mind - and that is how a month slips through the cracks so completely.

Now, focusing on the highlights of the month...

It took a bit of time, and several attempts, but at the beginning of the month I finished a piece I call "Breaking for Lunch"

This is a collage of 6 separate photographs I took of a crow at the beach.  He would take a shell, fly up into the air, then drop it on the rocks below in an attempt to crack it open.  I put the images together by printing them onto transparency sheets, transferring them to water color paper, then painted the whole scene with watercolor paints.

Working on this project was frustrating at times (the transfers didn't always work) but it was incredibly therapeutic.  At the end of the day I could turn my back on my office and escape to the cool basement filled with art supplies and soothing music, and allow the anxiety to drift away.  I enjoyed the process of it... the practicing to get consistent results with the transfers, the challenge of getting all the photos to work on one sheet, the experimenting with color to help convey the tone and texture of the day.  The ATC's I made prior to this carry with them some instant gratification, but having a larger and more detailed project to work on gave me something to look forward to at the end of the day.

At the end of the month, I celebrated my birthday.  To be honest, I was still in such a retreat mode that all I wanted to do was be someplace quiet... no hosting, no party, no cake - just quiet.  Lucky for me, the weather broke the weekend before my birthday, so D, G and I set out to spend a Saturday bird watching/photographing at a nature preserve a little south of us.  I had high hopes for the trip, as I'd heard there was a family of Great Horned Owls living just off one trail.  Some helpful birders had posted on websites as to where to find the nest, but when we arrived at the volunteer center we were informed that the owlets were out of the nest and we'd have to search them out in the trees.

D turned out to be the Master Bird Spotter... while standing on a wooden boardwalk amongst 4 other birders with scopes, we all squinted and squirmed and searched the tangle of tree branches while D glanced up for about 2 seconds, pointed and said "What's that bit brown spot in that tree?"

The larger frame is what my camera saw, this is shot through a 300mm telephoto lens (which illustrates how far the bird was)  I enlarged just the baby owl and put it on the image as an inset so it's easier to see.  The babies are still rather furry looking and have not developed the tell-tale "horns" yet, but they are out of the nest.  I wish I could have gotten a better shot, but I'm still extremely excited to have spotted one in the wild at all.

Another great find of D's was this bittern, hunting in a small pond next to a very populated area:
There were quite a few people walking on the path behind me who never noticed this little hunter at work.... at least, they didn't notice until D said "What kind of bird is that?" and I popped up my telephoto to get a shot.
That is the great thing about birding at a nature park on a busy day, by the way... plenty of other observers to point out creatures that you might otherwise have missed.

All in all, we walked over 4 miles that day, myself carrying around 30 pounds of gear total, and I managed close to 6 GB of photos.  Some of my better photos were of this bittern (the series of shots is already up on my site) some tree swifts, a turtle, a variety of ducks, and several Great Blue Herons.  We also had the pleasure of observing many bald eagles and egrets.  Although they were too far away to get any really clear shots, it was fantastically amazing to watch them fly and interact with each other.  It was absolutely the most perfect way to celebrate my birthday and was exactly what I needed.

Wednesday, February 29, 2012

Experimentation in miniature

Over the years I have read through many a craft magazine and art book, picking up bits and pieces of ideas and inspiration to be filed away as a project for a "someday" project.

Some day I will paint my own gift wrap.

Some day I will create a crazy-quilted pillow with intricate stitching and beadwork.

Some day I will do an image transfer onto canvas.

As I was recently researching the web for information on the Impossible Project films (sadly finding out that they have no ability to revive the film that I actually have cameras for) my web browsing brought me to a video showing how to do an image transfer from an inkjet transparency.

This video not only reminded me of my desire to transfer images to canvas, but it also reminded me that I bought a packet of Artist Trading Card (or, ATC) blanks a few years ago and never did create any.  I checked my supplies and found an abundance of watercolor paper, artist medium (I used acrylic matte finish) and inkjet transparency paper... and half a hard drive of scanned black and white images to pick from.

All the supplies needed to experiment without one trip to the store... which I believe vindicates my art supply hoarding.  But I digress....

I chose a few images I thought might make for interesting ATC subjects, printed them out (remembering to reverse the image) and began experimenting.  It took a few tries to get a feel for just how much medium to put on the surface, how delicately to place the image, and how hard to press it down.  In my first few attempts I did not have enough medium on the paper, so very little of those images transferred.  In the video (linked above) she uses a brayer to roll her image, but I found that every time I used mine I would smudge a few parts of the image... so just pressing smoothly with my fingers without shifting the image worked the best for me.  Once I had a few successful transfers, I embellished with a few collage items, stamps, ink, acrylic and watercolor paint... 

I also attempted one larger transfer (which didn't have quite enough medium, but I embellished anyway)


This past weekend I decided to experiment with layering transfers, and using color images with gloss gel medium instead of the matte.  I printed a shot of the EMP (Experience Music Project) exterior and a shot of the Space Needle on a blue sky day and transferred them over, EMP first.

I do like the paint effect of how this medium dries.  What I found here is that, although the images appear quite transparent on the transparency sheet, once they are transferred to paper they end up much more solid.  I thought the EMP would come out more behind the blue sky, but it virtually disappears and the darker portions become muddy beneath the Needle.  I think if I want to layer, at least one of the images needs to be mostly white (to end up clear) so that it stands out more.  Or perhaps I could print them both lighter to begin with.  Or maybe I layer a black and white over top of a color image.

The experimentation shall continue

Friday, February 17, 2012

Home Made Retro Fun

A few weeks ago, D surprised me with a camera kit he found online at a super-cool photography related web store: PhotoJoJo.  (The site gets cool points for their personality... rivals Think Geek!)
For a mere $20.00, the kit came neatly packed with everything necessary to make a brand new, all plastic 35mm Twin Lens Reflex camera, complete with plastic lenses and "very tiny springs" to make the shutter release.

The kit comes from China, and the instructions and manual are translated from Chinese to English.  Badly.  An example...
Given that a few instructions were lost in translation, it took me a little longer than the "allow one hour" time recommended for the building of the camera.  However with just a few moments of back-tracking (and grabbing a better task lamp to work with) I had a finished product in roughly 90 minutes.
I am most impressed with the process of building the shutter release for the shooting lens.  It is triggered with a series of three small springs (two of which were mislabeled in the packaging) and the tension for the trigger is managed by a tiny screw which had to be adjusted *just so* in order to make the shutter click without sticking.  (Part of the reason the build took longer is probably because of the time I spent testing the shutter release)

The dinosaur... in case you're wondering... is part of Photojojo's marketing - every order comes with a Stow-away-a-saurus in the box (labeled on the invoice as "stowawayasaraus - price: RWARR!") He was my buddy through the building process :)

Upon finishing the camera, I loaded her up with some 35mm black and white and took it out for a test drive.  It only took about 10 minutes for me to realize that the viewing lens (top-front of camera) was going to be a thing of inconvenience.  The gasket which was meant to hold the lens in place is smooth plastic, and if the camera was tilted back beyond about 15 degrees (or put in a camera bag, or slightly jostled, or breathed on too heavily) then the gasket would slide backwards into the viewing box, along with the lens - requiring both lenses to be removed and re-set on the camera.  This didn't expose the film at all, but it was a major pain in the ass, particularly since the first time I took the camera out it was only about 37 degrees outside, and my fingers were fairly frozen by the third camera-fix attempt.  On our way home that day, however, D stopped at Home Depot and picked up a small rubber gasket (like what you might use for a garden hose to get a tight seal at the faucet) and I replaced the smooth plastic ring with the nice sticky rubber one.  It worked like a charm... the focus lens has yet to be jostled by even the worst of my clumsy handling.

The following weekend (Superbowl Sunday!) we headed out to the train museum in Snoqualmie to do a bit of shooting in the quiet afternoon.  I managed to fill up the roll with test shots, and popped straight into the darkroom at home to develop the roll immediately.

I found that the focus appears to be fairly accurate insofar as what the focal lens shows, however the lens itself is like looking through a porthole - whereas the film in the lens below captures a rectangular frame.  Therefore, the results with this camera are going to be a bit unpredictable (I know that more will be on the film than what I see in the view lens, but I don't know exactly how much more yet.)  I also learned that the location of the shutter release (on the front of the camera body) makes it a little challenging to hold the camera steady and flat while shooting.  Several frames were blurry from camera shake, but luckily I felt it at the time and took many shots twice to get good focus.

Here are a few of my favorites from the first test run (shot on a thickly overcast day with 400 speed film - I'm extremely happy that the shutter release I built actually works!)


I'm very excited to have a new point of view to shoot in lo-fi... it is interesting to have a different perspective and framing, and it is conveniently compact enough to sneak into my gear bag for future outings.

Tuesday, January 24, 2012

The Basement Redux

This project was about 7 years in the making.  From the day we moved into the house and determined the basement would be the "project messy room", I dreamed of having a wall of shelves.  It wasn't in the budget - in terms of money or time - so instead I made do with what I had... which was a hodge podge collection of Rubbermaid-esque organizers and shelves.  It grew over the years... a  box here, a pile there... all placed with the most innocent of "I'll get to that later" intent.  Until it became the Wall of Doom.


So I pulled everything off of that wall and stacked it on the other half of the room.


Then I felt much better about the Wall of Doom.


To answer a few questions...
This is how the house was when we moved in.  I don't know why there is a big ugly patch job on the wall.  The black cord is the cable - the basement was the original family room and this wall used to house the entertainment system.  The beadboards?  No idea... my theory is that the space behind it is foundation, but it runs along the length of all the other walls as well, so it might be hallow.  I just haven't really had a desire to yank it apart and take a peek.  Some day, when we "re-do" the basement, D will probably take a sledge hammer to it.

This project is more of a... "Dear Lord I need this room to be FUNCTIONAL again or I will go insane and take everybody with me!" emergency, lowest budget possible, throw some damn shelves on the wall already and be done with it - project.
After shopping around, I decided to go with ClosetMaid - easy to install (thanks to the wonderful top-rail)  I didn't bother painting because I knew I'd just be covering the wall up anyway.  And, you know, eventually we'll "re-do" the basement.
Maybe in another decade, but I digress...

In the installation process I discovered that the floor joist for the kitchen appears to run about mid-way down the wall.  The middle screws of each vertical track were rather difficult to get into the joist (requiring the drill instead of my normal +2 Electric Screw Driver) but the tracks are incredibly sturdy.

The clearing and installation of the shelves was the relatively easy part.  The sorting, reorganizing, and finding homes for all my supplies was difficult.  I shopped for quite a while online, looking for "anything but clear rubbermaid" boxes that would not break the bank.  My favorite were some larger sized fabric boxes with lids, however they ran an easy $25.00 each at the cheapest, and that was just too much.  One night, as I read the description of one of these over-priced dust collectors, I thought to myself... "I'm not spending $25.00 on fabric and cardboard.  I *have* fabric and cardboard!  Wait a second... I *HAVE* fabric and cardboard!  Why not just cover boxes with fabric from my stash?"

I still didn't have enough boxes, but Home Depot had banker's boxes for $1.88 a pair.  Those, plus  my fabric stash and a bit of hot glue, and I had much more appealing storage containers for a fraction of the price.

Then it was time to put everything back.

The Craft Wall of Goodness.

I still have a couple of boxes to eventually replace, and I need to get a hanger of some kind for my quilting grid rulers (which will help to cover the ugly patch on the wall) but my room is organized and clean and functional again, and I've already used my project table!

Just as I finished clearing the last of the old rubbermaid out of the basement, the further light fixture (the horribly ugly light that shines so bright in the photo with the piano) has decided to go on strike.  I haven't decided if the basement is protesting the general upheaval, or if the ceiling is just saying "hey, LOOK AT ME!  I'M UGLY AND NEED FIXING UP TOO!"  In either case, I now need to get a floor lamp for G's project area until we can fully address the basement "re-do".

*sigh*