Monday, May 17, 2021

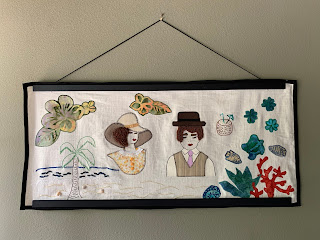
Claude and Claudia: Tropical Dreams

I finished this project in the fall of 2020 with the plan to hang it on the wall, take a photo of the finished project, then do a blog post about my creation process.  Then I procrastinated on hanging it until May of 2021.  

So without further ado I present: Claude and Claudia: Tropical Dreams.


This project began as so many of my projects do... sorting items in my craft room to find inspiration.  Years before her passing, my grandmother had shipped a box of patterns and projects in various stages of completion.  Separated into whatever spare box she had available, some projects have clear patterns, some include a hand-sketched idea of an end quilt size, and then there are several random projects with multiple pieces cut, but no instructions.  With these projects my grandmother would typically complete one block, then pack away several additional pre-cut bits and pieces to finish additional blocks of the same theme at some later date.

The box I opened on this evening had one completed block inside with a couple who had been completed with a combination of acrylic paint and applique.  Below this block were several more prepared blocks with the couple drawn in fabric pencil, some blocks had features painted, some were just the outline, and a few had clothing pieces pinned in place waiting to be sewn later.

This pattern reminds me of a grown-up version of Sunbonnet Sue.  I've done some searching online but cannot find a specific name for this couple, so I decided to name them Claude and Claudia


My initial thought had been to complete the blocks that my grandmother had started, but I felt that the way she had finished the hat looked a little flat with the one color, and the brim seemed heavy in the front.  I determined I wanted to do one block from scratch using the original pattern, and see if I could come up with a more realistic finish for Claudia's hat.

I began by tracing the original pattern from one of the unfinished blocks onto tracing paper, then used that to trace the pattern onto my base fabric.  I chose linen as my base, so I taped the edges with masking tape to keep the loose weave from fraying while I worked on the piece.

My next step was to determine which parts of Claude and Claudia should be acrylic paint, fabric, or embroidery thread.  
I then traced the reverse of the clothing onto the paper side of fusible interfacing and roughly cut around each piece.

Turning to my fabric stash, I picked through my cotton fabrics to find complimentary outfits for Claude and Claudia.  I ironed the fusible interfacing to the wrong side of the fabrics, cut them out on the pattern lines, and ironed the clothing in place on my base fabric.


I chose to paint the back shoulders of Claudia's dress, and Claude's shirt and tie, along with their facial features.  In this image the painting is done and the clothing is ironed on, but not yet appliqued. 

I used felt for the hats to add some texture.  Claudia's hat looks much more realistic with the darker shade under the brim and the lighter shade on top.  I machine appliqued the clothing and hats using the button stitch setting on my machine, then I added some lace and ribbon embellishments to Claudia's outfit.


This is why I have a big jar of buttons!  They are so useful!

I had been thinking a lot about vacations while working on this project... both past vacations and all the vacation plans we had made, cancelled, remade, and re-cancelled throughout 2020, so I decided to theme this piece as a tropical dream.  I dug into my stash of batiks, pulled out some tropical prints, and made appliques using the same technique I'd used for the clothing.  I made more appliques than I had room for so that I would have a variety of objects to play with on the design.

I settled on a combination of florals, ocean themes, and I sketched some additional tropical features to embroider later.  After pressing all the pieces in place, I machine appliqued the pieces down.  


Next came the hair.  I chose to use a punch needle for the hair for both Claude and Claudia.  (This is a technique used in making rugs, where the thread is punched through the fabric from the back leaving a loop of thread on the front of the piece).  Claudia's hair is on the longest setting for a full look.  Claude's hair is on the shortest setting 


I used several different embroidery stitches on the beach to differentiate the sand, foamy water line, waves, and the horizon.  The white thread has bits of glittery strands to add an iridescent reflection on the water line.   I also attached a few small seashells on the seashore.  


Claude's side of the panel has a coral reef applique scene along with a tropical drink served in a coconut shell.


Friday, September 25, 2020

Graduation Quilt

Over the past 15 or so years, I have collected and stored away significant t-shirts from my daughter's clothing, with the grand plan to turn them into a quilt for her to take away to college.  As time became crunched with the multitudes of events, I began to explore alternative options.  I had concerns that it would take too long for me to dust off my rusty skills and make something of quality in time for her to whisk it away with her to her new college dorm adventure.  I'll not bother to delve into why things changed, but suffice it to say... by the spring of 2020 it became abundantly clear that mailing the shirts off to a 3rd party was no longer a viable option, and simultaneously my time commitments outside of the house were drastically reduced.

So I rolled up my sleeves, pulled out some reference books, and set to work.

The method I decided to use for assembly is a quilt-as-you-go technique described in the book "Block by Block" by Beth Donaldson.  (This is the version I have - although I believe newer versions exist)  This method allows for more detailed quilting on a smaller scale in the individual blocks using a standard sewing machine before piecing the blocks into a larger finished item.  It also requires significant pre-planning, as the fabric for the back of the quilt needs to be attached to each block as you go (rather than the more traditional method of piecing a top and fixing it to the back).

To begin, I pulled my collection of t-shirts out of storage, laid them out, and narrowed down which t-shirts would be the most significant to include.  From there, I contemplated how to design the quilt top.


The challenge in the design is the varied sizes of prints on the t-shirt - I wanted to include every whole design without too much "dead space" around.  To ease the design process, I downloaded the Electric Quilt 8 software, which includes options to take photos of fabric and pull the images into a unique design.  To that end, I took photos of each t-shirt with my cell phone, loaded the photos into the software, and began laying out the options by combining shirts with common widths into columns.   


The next challenge was to adjust the method of assembly.  The technique in the book involves piecing blocks into rows, then combining the rows top to bottom.  With this quilt being based on the width of t-shirt first, I had to adjust the technique to piece the columns together first, then attach the columns from left to right.  This also involved changing up the sashing (borders around each block) due to all the blocks being different sizes. Traditionally each block would be the same size, and therefore all the sashing pieces would be as well.  After coming up with the layout, I printed several copies of my design, and made notes as to the size of each t-shirt and each sashing piece.  

Being made of knit fabric, t-shirts will shrink and curl once the seams are cut, and conversely they stretch and become misshapen when being run through a sewing machine.  To avoid these problems, I would trim the sleeves off the shirts, then iron lightweight fusible interfacing onto the back of each t-shirt design to stabilize the fabric. 

My first cut - I discovered that the t-shirt shrank down after I cut the sleeves, but I did not notice until after I had ironed on the interfacing.  My solution for this shirt was to add an inch of fabric on one side.  

For all future t-shirts, I made sure to stretch the front of the shirt back out PRIOR to ironing on the stabilizer. 

Progress on the block prep... after lots of measuring twice, cutting, ironing, and cutting again, I had my stack of t-shirt blocks.  The top block featured here is actually three pieces of one shirt.  The printed design had been spaced out on the top left, bottom left, and back of the shirt - all of which left a lot of black dead space, so I reinforced each section then sewed them together to make one block.

As I attached the sashing, I checked to see how the pieces would eventually line up.

This method requires for the batting and backing to be pre-cut.  Since the borders are the longest pieces used, I cut those in the border fabric and batting first.  I discovered that these new fabric clips were the perfect solution for attaching my tape measure to the batting for more accurate measurements.


Here is my work table as I begin to cut the backing fabric and stack the blocks on top.

While in the quilt shop I had been gently - but firmly - instructed to NOT use pre-cut bias tape for a hand made quilt!  I might have made my own quilt binding in the past, but if I did... it was so long ago that I don't remember doing it.  At the insistence of the fabric store clerk, I bought extra backing fabric to be used for my quilt binding.  I had just enough left to cut just the right amount of 2.5 inch strips to piece together to make just enough binding.

Perhaps the reason I never made quilt binding before is because Youtube wasn't around back then.  Thanks to several instructional videos, piecing the binding strips was a snap.

And it was fun!  I look forward to using up my fabric strips to make rolls of quilt binding!

Once all the cutting is done, the quilting begins.  I chose to freehand quilt around each design, basically doing a ripple-effect / double halo around the design within each shirt.  I found it much easier to be consistent if I drew my lines with a chalk pencil first, then followed them with the needle.  Given the varied colors of the t-shirts I was working with, I opted to quilt with a neutral grey thread - something that would show up on all the backgrounds but not overpower the t-shirt designs themselves.

After gaining some confidence with my outlines, I went back to several blocks and added some quilted details to a few of the blocks.

I can confidently say that I have never quilted a quilt border before - I have always stitched in the ditch and left it at that - so quilting a design was a brand new challenge for me.  

Following the method I had used on the blocks, I cut a template out of plastic and used that to draw my quilting lines on the borders.  I began with the design in the very center of each border, and drew them out towards the ends, stopping about 2 inches shy of the end so that the design wouldn't be abruptly cut off.

One border down, three to go.

I wear gloves with sticky fingertips specifically designed to help grip the fabric without having to use a bunch of pressure on my hands.  I also drape the fabric over my shoulder to keep it from bundling onto the floor and getting stuck.

Borders and blocks quilted!   The next step is to trip the excess batting/backing and piece the blocks together.

My one big OOPS in this project - I was supposed to cut off the excess batting on the back, and accidentally cut through the front fabric.  I was fortunate to have enough leftover sashing fabric to cut a new piece - the repair involved undoing all the stitching for the cut piece and where it attached to the sashing of the surrounding blocks, and sewing a new uncut piece into place before proceeding.  It put only a slight dent into my time, but it was a lesson well learned - triple check where your blades are before you close those scissors.

The more you pin, the less you pucker.  Pinning the columns together was time consuming, but absolutely worth the time spent for such near-perfect flat results.

As the quilt grows, my work space migrates from the sewing room to the kitchen floor.

Also as the quilt grows in weight, my machine is scooted further into the table to give support to the left for the increasing weight of the added columns.  Those green clips were handy for holding the folded quilt on the side.

My time became crunched, and I now realize that I did not take a photo of the pinning process used to "close the back" - the blocks and columns are sewn together through the top fabric only, leaving a back flap of batting/backing fabric which you can see here to the left of all the pins.  Once this portion is complete, the back flap covers the seam, the raw edge of the back fabric is folded over and ironed, then pinned all the way down the seam, and stitched down.  Stitching can be done by hand, but I prefer to take the time to pin it all the way down so that the sewing process is just one quick, straight stitch.

This method of quilting can sometimes feel like you are spending more time on the cutting table and ironing board than the machine, but I don't mind the constant change (in fact, it's probably better for my back) and it makes for an easier time quilting on a standard machine.

Once all the columns were connected, the borders and binding went relatively quickly - and I managed to finish in time to present it at our end-of-summer graduation party.


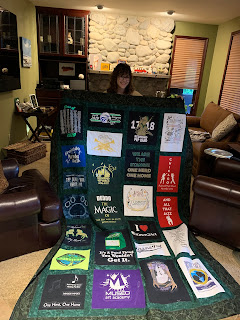
The end result!

The entire front of the quilt

Here is the back, complete with my "hand made by..." tag in the lower corner.
The following are the additional personal designs I quilted into some of the blocks.

A paint brush on the t-shirt from her first art studio where she took art classes.


Music notes on one of the band t-shirts.

A Hidden Mickey on the band t-shirt from the year the band traveled to Disneyland

An art easel and painting of a giraffe from the t-shirt from her first job at an art studio (the giraffe is based on an actual drawing she did while teaching)

A stage light on the t-shirt from one of the musicals where she did an incredibly complicated light design


An outline of the zig-zag cookie cutter we used to make cookies for the cast and crew for the theater show based on Peanuts characters.

In the end, I'm extremely happy with the results, and grateful that I had the opportunity to complete this project myself in the way that I had originally envisioned it over a decade ago.  It was just a joyous project to work on, and has rekindled my love of sewing and quilting.


Thursday, January 03, 2019

Christmas Gift Projects Revealed!

Happy New Year!

The gifts are all distributed, the holiday trip is complete, and now it is time to reveal what I've been spending all my "spare" time doing for the last couple of months!


Upcycled Mint Tin Mini Albums:

The most time consuming of my gift projects this year was my group of upcycled mint tin mini-albums.  The extra time was not due to construction, but just the nature of how I approach collage in general - I tend to spread out all potential components (paper, dimensionals, paint, etc...) shifting options and items around until I find the final combination that I am happy with.  

We'll start with the photos of the finished projects

I put small dimensionals on the front cover of each album, the ribbon poking out of the lid is the tab to pull the album pages out.

I used one paper pattern for the interior pages, and chose alternating red and green patterned papers for the fold out pages.

Fully extended, the albums are meant to stand upright as two-sided display.  I left the pages blank for the recipients to add photos/art work/etc... from their holiday celebrations.


To begin construction, I start by taking the lid off the mint tin, line the tin parts up on the chosen paper, trace around the tin, and cut out the outer cover.  I also trace and cut the paper for the interior of the tin, checking the size and trimming the interior paper slightly smaller so that it will fit.

Always check for correct size before adhering!


Once the papers have been chosen, I sand the outside of the tins and paint the exterior edges.  

While the paint dries, I cut the folded paper for the interior pages.  I used plain white paper as the base for my accordion-folded pages, cutting a strip 12 inches long with a width that would fit inside the tin, and I scored the page every 2 inches to create the accordion fold.  I then clipped the corners with one of my corner punches to make them rounded.  

I cut the interior green and red pages slightly smaller than the accordion page, clipped the corners with my corner punch, and then glued them to the pages.  I made a pull tab out of ribbon, which I glued to the end page prior to adding the decorative paper on top.

Here are a few finished tins showing the tin closed, open, and unfolded.


The interior hinges are two additional pieces of ribbon which I attached to the interior of the tin with double stick tape prior to gluing down the interior paper.  I did not take photo of that part in progress, but hopefully you can see how it works from this zoomed-in shot.

One thing that I had changed from my original plan was the exterior of each tin.  After having painted and constructed two albums, I discovered that the paint was chipping in several spots.  I've painted tins before without a problem, so I presume that I did not sand these tins enough prior to construction.  As a fix, I decided to cover the exterior edges with thin strips of paper instead of paint.  This made a nice, smooth finish, however the tins no longer closed all the way - which I think is fine, as they aren't really meant to stay completely closed anyway.


Block Carving Project

In April of 2017 I enjoyed a crafty afternoon in Portland carving linoleum blocks with my friend. During my visit she introduced me to carving blocks which were much easier on my arthritis than the hard linoleum blocks I'd had in my craft stash.  Having experienced this magical material, we took a ride down to her local art store where I picked up a few pieces, along with some printing paint, for me to take back home with me.  These supplies sat in my "Someday I'll do this" area of my craft room until this past fall, when I determined that I could not allow myself to load up on another new set of art materials until I at least tried to work with the brand new set of art materials I already had. To that end, I decided to try to carve a design that could be used as this year's Christmas card.

My initial attempt was a simple design of snowflakes and swirly wind, printed in blue.  It took a few tries to get the correct amount of ink and pressure for a nice print.  

I was inspired by my first attempt, but limited in my choice of color because I'd only purchased small tubes of shades of blue paint to begin with.  I bought more blocks and paint colors online, and thought I might attempt to do a multi-layer effect, carving tree branches on one block in green, and ornaments on another in gold, then layering the two.

The layers did not turn out the way I had hoped, the green branches showed through the gold paint, so I went back to the printing portion and did a three step process instead... printing green branches, then black ornaments, then gold on top of the black.  The end result was a sort of shadow effect - an example is on the right below.  

This is a shot of the work I shared at my November APex meeting.

Although I liked the final result of the ornament photo well enough, my mind was buzzing with more ideas.  I thought it would be fun to do some carvings based on photos that I've taken.  The first photo that came to mind for this was a head shot of a nene I'd taken on my first trip to Kauai.  Rather than draw freehand, I thought it would be more accurate to trace the photo and transfer it onto the stamp. 


The process actually worked precisely the way I had hoped it would... I traced the parts of the nene that I wanted to have on the block, turned the tracing paper over onto the block, rubbed the tracing paper (which transferred the pencil lead onto the block) then carved around the pencil to bring out the nene.  


I used the same process on a photo of a black-capped chickadee which I'd taken last year, and after much deliberation I ended up using this print for my Christmas cards.


All of my other Christmas gift projects were fairly straight forward:

Cork message board:
I actually had enough corks to make two of these as gifts this year.  I bought the frame, poured out my corks, and went to work designing a pattern to put them in.  Some of the corks needed to be cut down to size, so I steamed those for 10 minutes to soften them up and cut them with a serrated knife.  After deciding on a final pattern, I then glued the corks down with a super strong (and stinky) glue to hold them in place, attached the wall hanger on the back, and there you have it - a cork message board.

Photo Coaster Set:
I made a set of photo coasters for D's mom using photos from our trip to Jamaica back in 2009.  I had the photos printed, cut them down to size, glued them to the coaster squares, sealed the top with resin, let that cure for a few days, then covered the bottoms of the coasters with soft felt.


Reusable Coffee Cup Cozies:

I had a lot of fun making these coffee cup cozies!  I found the pattern online and chose fabrics based on the recipients.  The batting I used for the inside is an insulated batting made for things like pot-holders, so they should keep the coffee hot and the hands protected.   This project also involved digging into my stash of buttons.
I just love this Hobbit-themed fabric!  Here is how the cozy looks on a cup.

I used paper from my Christmas paper stash to cut the flat cup-shape out for each cozy to wrap around.

 Pencil Pouches
These pencil pouches had a dual-use in wrapping.  As a Christmas surprise I had picked up tickets to the local showing of Broadway's Lion King, and I wanted a clever way to wrap the tickets.  G uses a separate notebook for her scripts for drama club, so I found this Playbill themed fabric and I made a couple of pencil pouches for her.  The one on the right has an elastic band built into it which holds it to the outside of her script notebook.  The larger one on the left is a loose pencil pouch for her to keep other stuff handy.  I tucked a copy of the show tickets in the pencil pouch when I wrapped it for her.


Recipe Towel
I saw this idea online and thought it was very clever, so I made one for my sister.  I scanned one of our mom's recipes, flipped the image, printed it on T-Shirt transfer paper, then transferred it onto a tea towel.


Custom Ears
As a post-Holiday gift to myself, I made a pair of Chewbacca- themed Mickey ears just prior to our New Year's trip to Disneyland.  I did wear them for the entire duration of the trip, and random people would do a Chewey-call at me as I passed.  I was also singled out by Kylo Ren as a rebel spy on Star Tours (perhaps one of my proudest moments on a ride ever)  I made the ears from craft fur and put them over ear-shapes cut from foam to give them structure.  The belt is made from felt, which I glued together and put across the ear prior to sewing the pieces together.  I made the bow from black felt and glued it in the middle.  I had originally wanted to make the bow from Porg-printed fabric, however I could not find any Porg fabric anywhere (not even Spoonflower!) and I didn't have time to design my own... so as a compromise I made the bow from black felt and purchased a Porg pin to put on it.

This shot shows the ears after adding the porg pin.  The fuzz could not be tamed, even with hair spray, so after day 1 I gave up on combing the ears.

This photo was pre-planned for months - hence the immense grin on my face.  Look at how the belt on my ears lines up PERFECTLY with Chewey's belt!  


I now find myself in that post-holiday meandering, debating about whether or not I should pack Christmas crafts away immediately or give myself that bit of time with my vintage findings that I'd hoped to have prior to Christmas.  On the one hand, it seems a shame to pack it all up when I have ideas now, on the other hand I have no shortage of other projects that I want to accomplish before next year's Christmas gift blitz sideswipes me.

For the time being, I think I'll just enjoy another cup of tea while I straighten up my work space and contemplate my options.

Happy New Year, and may the force be with you!