
Over the past 15 or so years, I have collected and stored away significant t-shirts from my daughter's clothing, with the grand plan to turn them into a quilt for her to take away to college. As time became crunched with the multitudes of events, I began to explore alternative options. I had concerns that it would take too long for me to dust off my rusty skills and make something of quality in time for her to whisk it away with her to her new college dorm adventure. I'll not bother to delve into why things changed, but suffice it to say... by the spring of 2020 it became abundantly clear that mailing the shirts off to a 3rd party was no longer a viable option, and simultaneously my time commitments outside of the house were drastically reduced.
So I rolled up my sleeves, pulled out some reference books, and set to work.
The method I decided to use for assembly is a quilt-as-you-go technique described in the book "Block by Block" by Beth Donaldson. (This is the version I have - although I believe newer versions exist) This method allows for more detailed quilting on a smaller scale in the individual blocks using a standard sewing machine before piecing the blocks into a larger finished item. It also requires significant pre-planning, as the fabric for the back of the quilt needs to be attached to each block as you go (rather than the more traditional method of piecing a top and fixing it to the back).
To begin, I pulled my collection of t-shirts out of storage, laid them out, and narrowed down which t-shirts would be the most significant to include. From there, I contemplated how to design the quilt top.

The challenge in the design is the varied sizes of prints on the t-shirt - I wanted to include every whole design without too much "dead space" around. To ease the design process, I downloaded the Electric Quilt 8 software, which includes options to take photos of fabric and pull the images into a unique design. To that end, I took photos of each t-shirt with my cell phone, loaded the photos into the software, and began laying out the options by combining shirts with common widths into columns.

The next challenge was to adjust the method of assembly. The technique in the book involves piecing blocks into rows, then combining the rows top to bottom. With this quilt being based on the width of t-shirt first, I had to adjust the technique to piece the columns together first, then attach the columns from left to right. This also involved changing up the sashing (borders around each block) due to all the blocks being different sizes. Traditionally each block would be the same size, and therefore all the sashing pieces would be as well. After coming up with the layout, I printed several copies of my design, and made notes as to the size of each t-shirt and each sashing piece.
Being made of knit fabric, t-shirts will shrink and curl once the seams are cut, and conversely they stretch and become misshapen when being run through a sewing machine. To avoid these problems, I would trim the sleeves off the shirts, then iron lightweight fusible interfacing onto the back of each t-shirt design to stabilize the fabric.

My first cut - I discovered that the t-shirt shrank down after I cut the sleeves, but I did not notice until after I had ironed on the interfacing. My solution for this shirt was to add an inch of fabric on one side.
For all future t-shirts, I made sure to stretch the front of the shirt back out PRIOR to ironing on the stabilizer.
For all future t-shirts, I made sure to stretch the front of the shirt back out PRIOR to ironing on the stabilizer.

Progress on the block prep... after lots of measuring twice, cutting, ironing, and cutting again, I had my stack of t-shirt blocks. The top block featured here is actually three pieces of one shirt. The printed design had been spaced out on the top left, bottom left, and back of the shirt - all of which left a lot of black dead space, so I reinforced each section then sewed them together to make one block.

As I attached the sashing, I checked to see how the pieces would eventually line up.

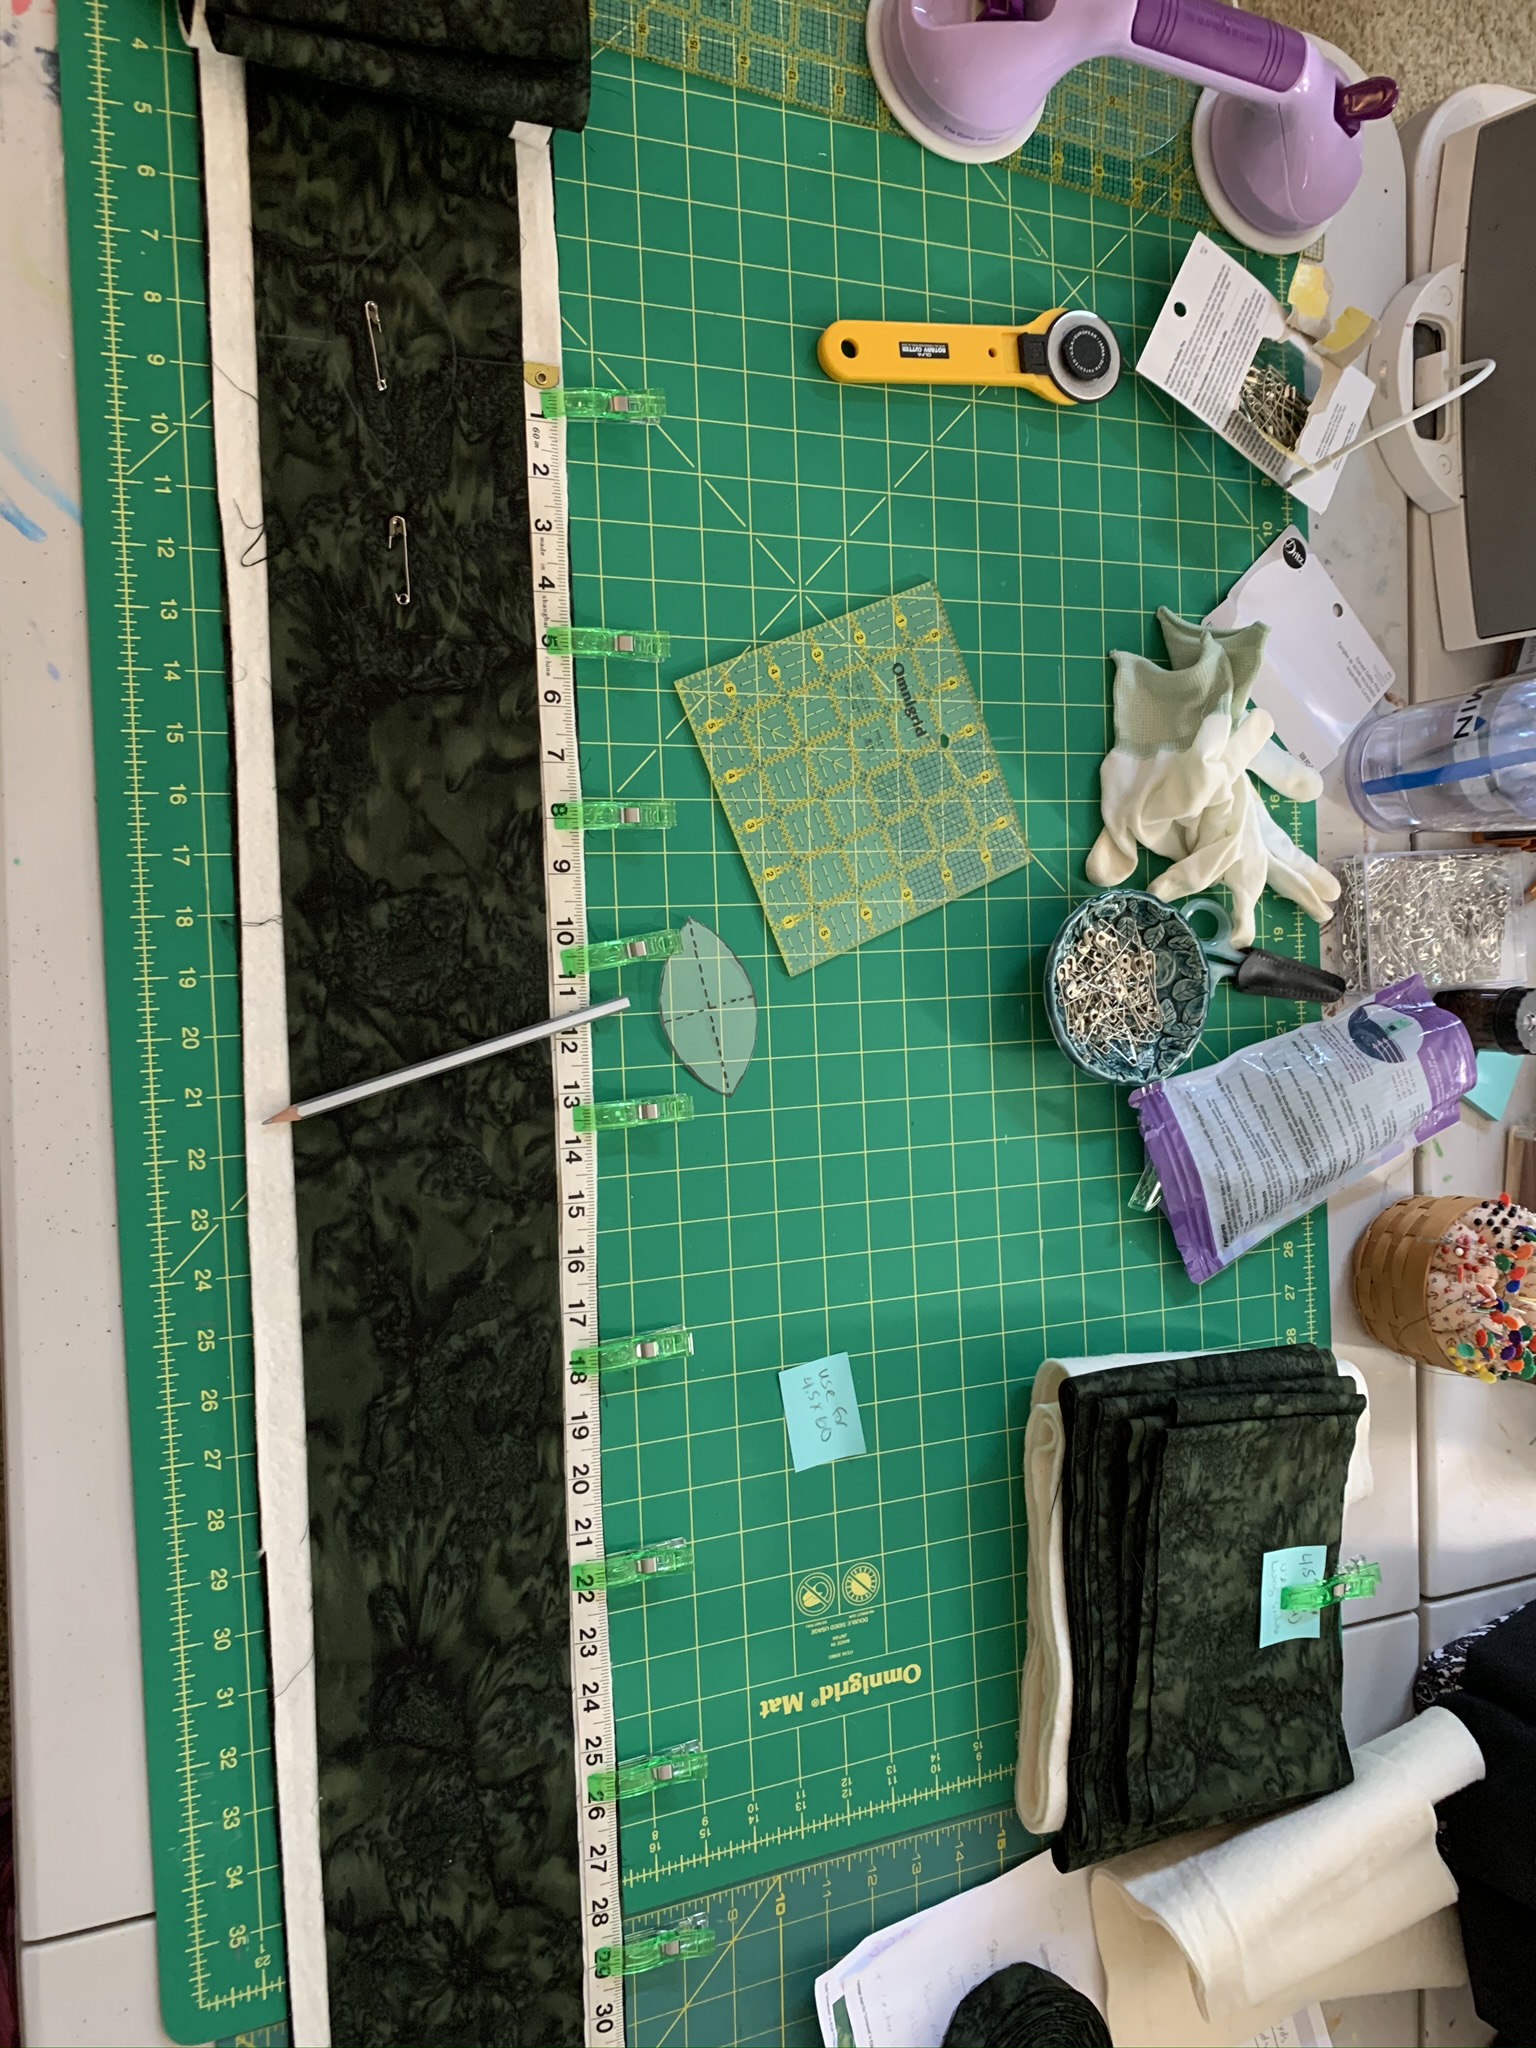
This method requires for the batting and backing to be pre-cut. Since the borders are the longest pieces used, I cut those in the border fabric and batting first. I discovered that these new fabric clips were the perfect solution for attaching my tape measure to the batting for more accurate measurements.

Here is my work table as I begin to cut the backing fabric and stack the blocks on top.

While in the quilt shop I had been gently - but firmly - instructed to NOT use pre-cut bias tape for a hand made quilt! I might have made my own quilt binding in the past, but if I did... it was so long ago that I don't remember doing it. At the insistence of the fabric store clerk, I bought extra backing fabric to be used for my quilt binding. I had just enough left to cut just the right amount of 2.5 inch strips to piece together to make just enough binding.

Perhaps the reason I never made quilt binding before is because Youtube wasn't around back then. Thanks to several instructional videos, piecing the binding strips was a snap.

And it was fun! I look forward to using up my fabric strips to make rolls of quilt binding!

Once all the cutting is done, the quilting begins. I chose to freehand quilt around each design, basically doing a ripple-effect / double halo around the design within each shirt. I found it much easier to be consistent if I drew my lines with a chalk pencil first, then followed them with the needle. Given the varied colors of the t-shirts I was working with, I opted to quilt with a neutral grey thread - something that would show up on all the backgrounds but not overpower the t-shirt designs themselves.
After gaining some confidence with my outlines, I went back to several blocks and added some quilted details to a few of the blocks.
I can confidently say that I have never quilted a quilt border before - I have always stitched in the ditch and left it at that - so quilting a design was a brand new challenge for me.

Following the method I had used on the blocks, I cut a template out of plastic and used that to draw my quilting lines on the borders. I began with the design in the very center of each border, and drew them out towards the ends, stopping about 2 inches shy of the end so that the design wouldn't be abruptly cut off.

One border down, three to go.

I wear gloves with sticky fingertips specifically designed to help grip the fabric without having to use a bunch of pressure on my hands. I also drape the fabric over my shoulder to keep it from bundling onto the floor and getting stuck.

Borders and blocks quilted! The next step is to trip the excess batting/backing and piece the blocks together.

My one big OOPS in this project - I was supposed to cut off the excess batting on the back, and accidentally cut through the front fabric. I was fortunate to have enough leftover sashing fabric to cut a new piece - the repair involved undoing all the stitching for the cut piece and where it attached to the sashing of the surrounding blocks, and sewing a new uncut piece into place before proceeding. It put only a slight dent into my time, but it was a lesson well learned - triple check where your blades are before you close those scissors.

The more you pin, the less you pucker. Pinning the columns together was time consuming, but absolutely worth the time spent for such near-perfect flat results.

As the quilt grows, my work space migrates from the sewing room to the kitchen floor.

Also as the quilt grows in weight, my machine is scooted further into the table to give support to the left for the increasing weight of the added columns. Those green clips were handy for holding the folded quilt on the side.
My time became crunched, and I now realize that I did not take a photo of the pinning process used to "close the back" - the blocks and columns are sewn together through the top fabric only, leaving a back flap of batting/backing fabric which you can see here to the left of all the pins. Once this portion is complete, the back flap covers the seam, the raw edge of the back fabric is folded over and ironed, then pinned all the way down the seam, and stitched down. Stitching can be done by hand, but I prefer to take the time to pin it all the way down so that the sewing process is just one quick, straight stitch.
This method of quilting can sometimes feel like you are spending more time on the cutting table and ironing board than the machine, but I don't mind the constant change (in fact, it's probably better for my back) and it makes for an easier time quilting on a standard machine.
Once all the columns were connected, the borders and binding went relatively quickly - and I managed to finish in time to present it at our end-of-summer graduation party.
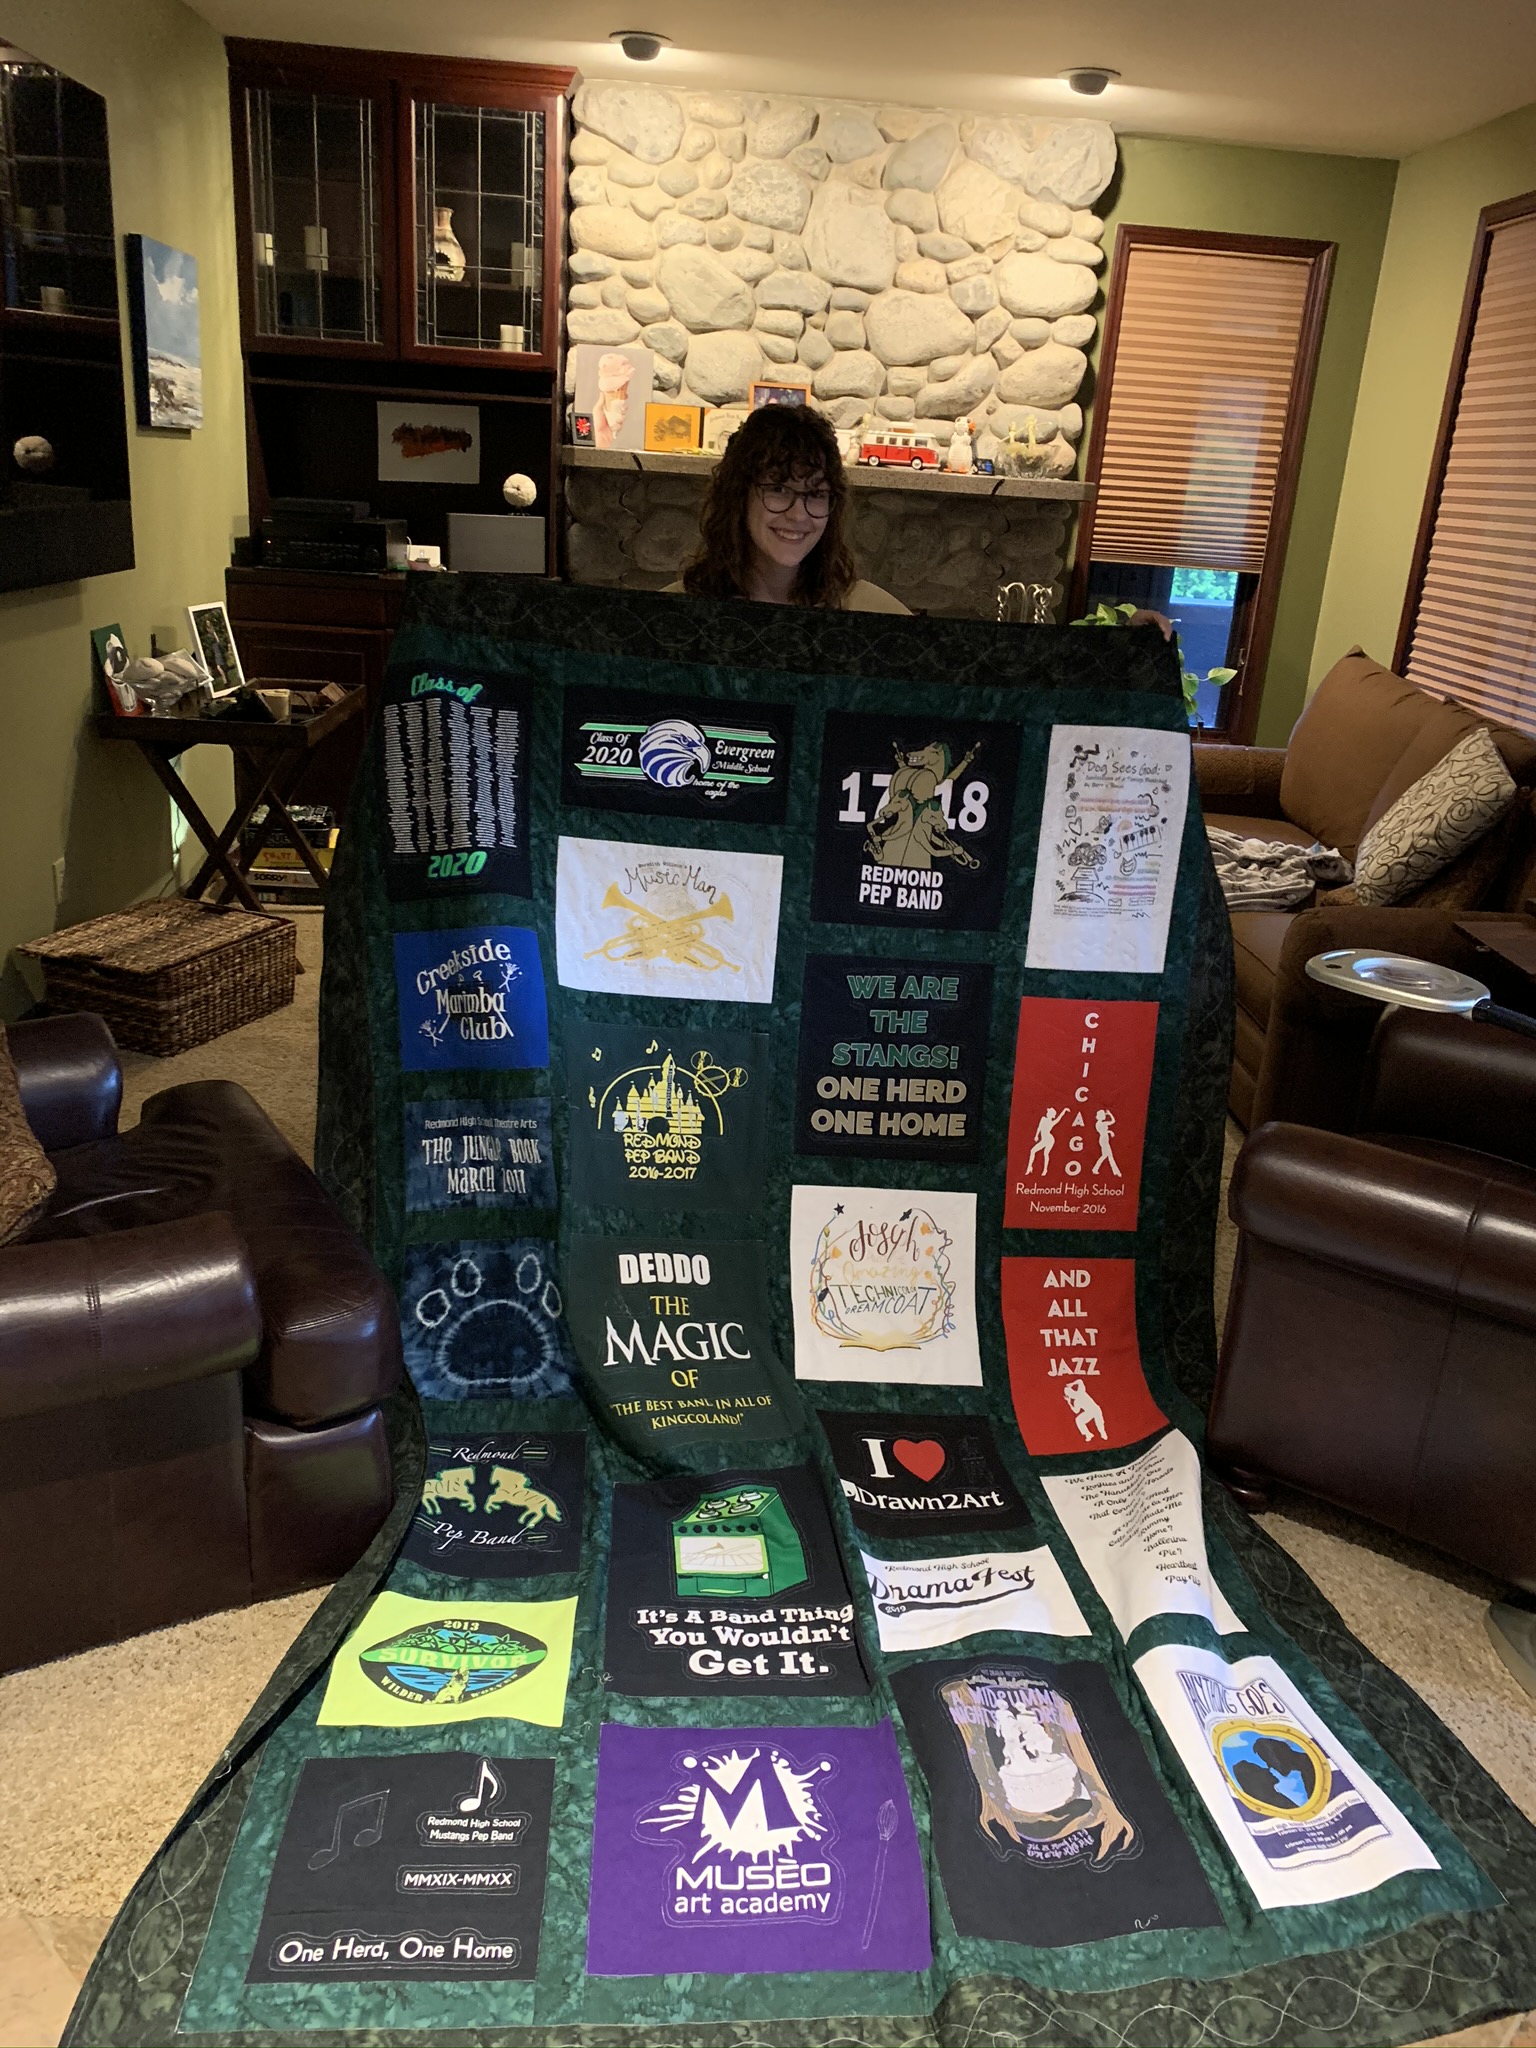
The end result!

The entire front of the quilt

Here is the back, complete with my "hand made by..." tag in the lower corner.
The following are the additional personal designs I quilted into some of the blocks.

A paint brush on the t-shirt from her first art studio where she took art classes.

Music notes on one of the band t-shirts.

A Hidden Mickey on the band t-shirt from the year the band traveled to Disneyland

An art easel and painting of a giraffe from the t-shirt from her first job at an art studio (the giraffe is based on an actual drawing she did while teaching)

A stage light on the t-shirt from one of the musicals where she did an incredibly complicated light design

An outline of the zig-zag cookie cutter we used to make cookies for the cast and crew for the theater show based on Peanuts characters.
In the end, I'm extremely happy with the results, and grateful that I had the opportunity to complete this project myself in the way that I had originally envisioned it over a decade ago. It was just a joyous project to work on, and has rekindled my love of sewing and quilting.