Wednesday, February 29, 2012

Experimentation in miniature

Over the years I have read through many a craft magazine and art book, picking up bits and pieces of ideas and inspiration to be filed away as a project for a "someday" project.

Some day I will paint my own gift wrap.

Some day I will create a crazy-quilted pillow with intricate stitching and beadwork.

Some day I will do an image transfer onto canvas.

As I was recently researching the web for information on the Impossible Project films (sadly finding out that they have no ability to revive the film that I actually have cameras for) my web browsing brought me to a video showing how to do an image transfer from an inkjet transparency.

This video not only reminded me of my desire to transfer images to canvas, but it also reminded me that I bought a packet of Artist Trading Card (or, ATC) blanks a few years ago and never did create any.  I checked my supplies and found an abundance of watercolor paper, artist medium (I used acrylic matte finish) and inkjet transparency paper... and half a hard drive of scanned black and white images to pick from.

All the supplies needed to experiment without one trip to the store... which I believe vindicates my art supply hoarding.  But I digress....

I chose a few images I thought might make for interesting ATC subjects, printed them out (remembering to reverse the image) and began experimenting.  It took a few tries to get a feel for just how much medium to put on the surface, how delicately to place the image, and how hard to press it down.  In my first few attempts I did not have enough medium on the paper, so very little of those images transferred.  In the video (linked above) she uses a brayer to roll her image, but I found that every time I used mine I would smudge a few parts of the image... so just pressing smoothly with my fingers without shifting the image worked the best for me.  Once I had a few successful transfers, I embellished with a few collage items, stamps, ink, acrylic and watercolor paint... 

I also attempted one larger transfer (which didn't have quite enough medium, but I embellished anyway)


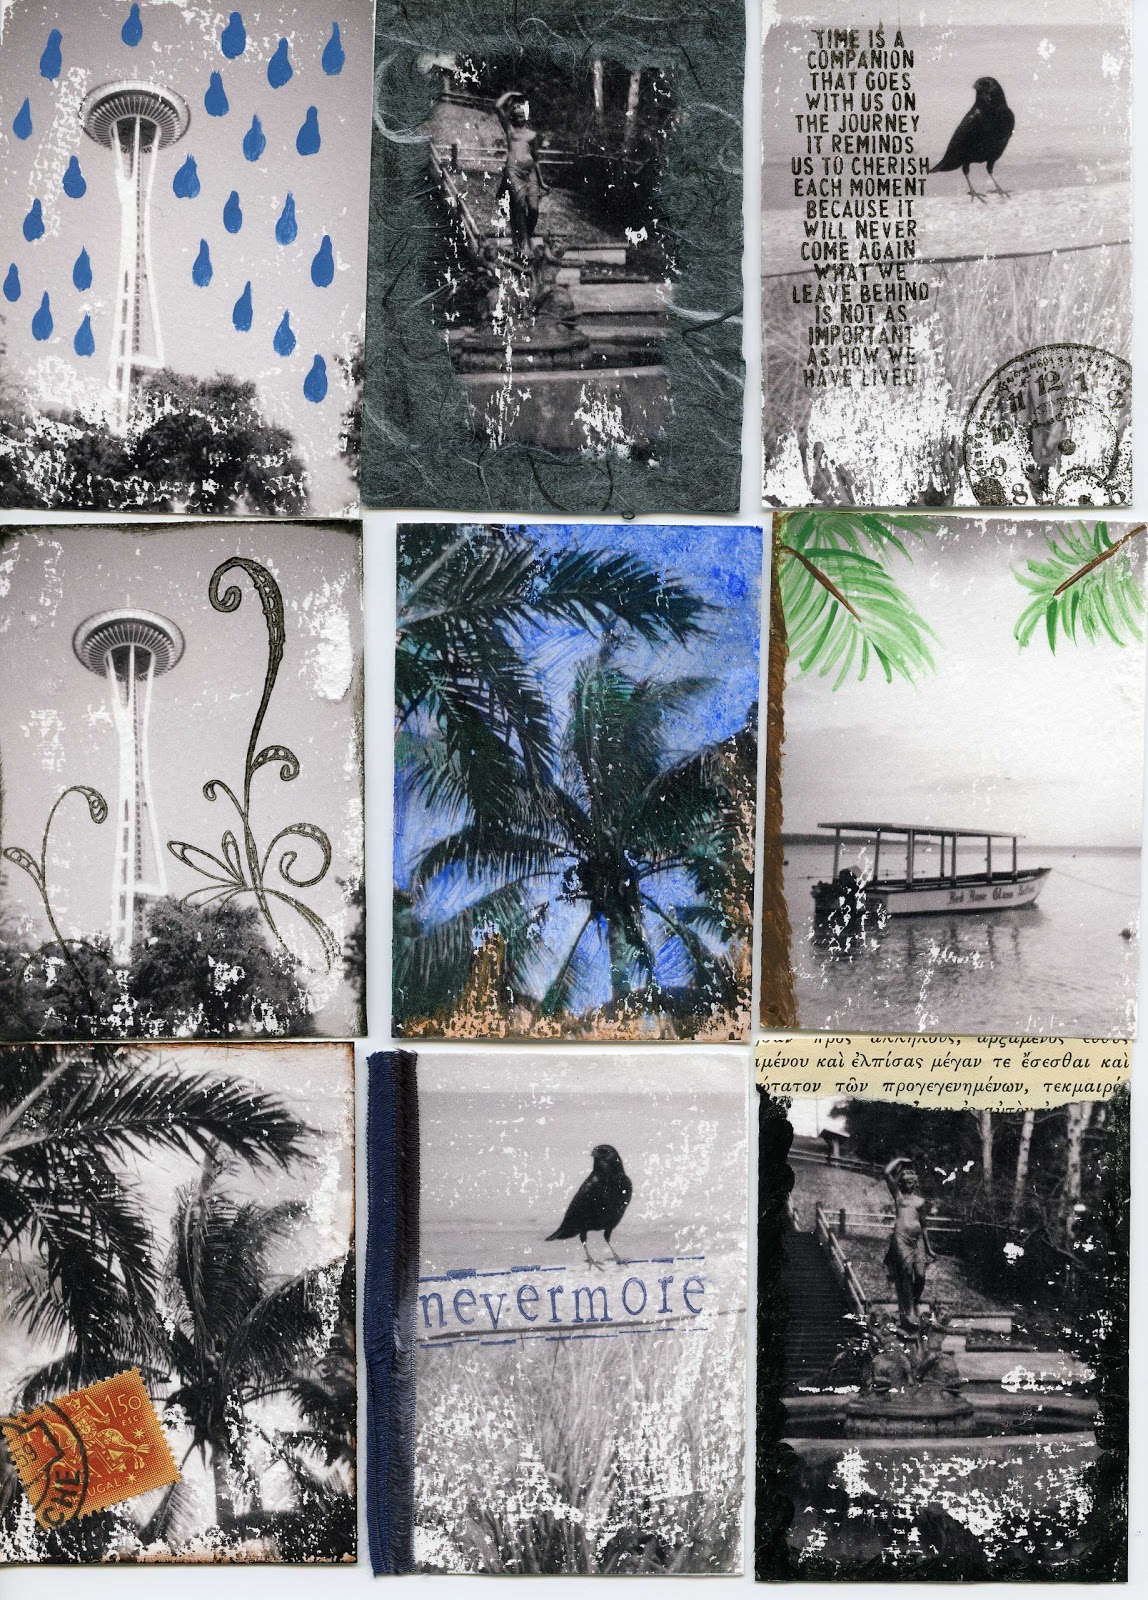
This past weekend I decided to experiment with layering transfers, and using color images with gloss gel medium instead of the matte.  I printed a shot of the EMP (Experience Music Project) exterior and a shot of the Space Needle on a blue sky day and transferred them over, EMP first.

I do like the paint effect of how this medium dries.  What I found here is that, although the images appear quite transparent on the transparency sheet, once they are transferred to paper they end up much more solid.  I thought the EMP would come out more behind the blue sky, but it virtually disappears and the darker portions become muddy beneath the Needle.  I think if I want to layer, at least one of the images needs to be mostly white (to end up clear) so that it stands out more.  Or perhaps I could print them both lighter to begin with.  Or maybe I layer a black and white over top of a color image.

The experimentation shall continue

Friday, February 17, 2012

Home Made Retro Fun

A few weeks ago, D surprised me with a camera kit he found online at a super-cool photography related web store: PhotoJoJo.  (The site gets cool points for their personality... rivals Think Geek!)
For a mere $20.00, the kit came neatly packed with everything necessary to make a brand new, all plastic 35mm Twin Lens Reflex camera, complete with plastic lenses and "very tiny springs" to make the shutter release.

The kit comes from China, and the instructions and manual are translated from Chinese to English.  Badly.  An example...
Given that a few instructions were lost in translation, it took me a little longer than the "allow one hour" time recommended for the building of the camera.  However with just a few moments of back-tracking (and grabbing a better task lamp to work with) I had a finished product in roughly 90 minutes.
I am most impressed with the process of building the shutter release for the shooting lens.  It is triggered with a series of three small springs (two of which were mislabeled in the packaging) and the tension for the trigger is managed by a tiny screw which had to be adjusted *just so* in order to make the shutter click without sticking.  (Part of the reason the build took longer is probably because of the time I spent testing the shutter release)

The dinosaur... in case you're wondering... is part of Photojojo's marketing - every order comes with a Stow-away-a-saurus in the box (labeled on the invoice as "stowawayasaraus - price: RWARR!") He was my buddy through the building process :)

Upon finishing the camera, I loaded her up with some 35mm black and white and took it out for a test drive.  It only took about 10 minutes for me to realize that the viewing lens (top-front of camera) was going to be a thing of inconvenience.  The gasket which was meant to hold the lens in place is smooth plastic, and if the camera was tilted back beyond about 15 degrees (or put in a camera bag, or slightly jostled, or breathed on too heavily) then the gasket would slide backwards into the viewing box, along with the lens - requiring both lenses to be removed and re-set on the camera.  This didn't expose the film at all, but it was a major pain in the ass, particularly since the first time I took the camera out it was only about 37 degrees outside, and my fingers were fairly frozen by the third camera-fix attempt.  On our way home that day, however, D stopped at Home Depot and picked up a small rubber gasket (like what you might use for a garden hose to get a tight seal at the faucet) and I replaced the smooth plastic ring with the nice sticky rubber one.  It worked like a charm... the focus lens has yet to be jostled by even the worst of my clumsy handling.

The following weekend (Superbowl Sunday!) we headed out to the train museum in Snoqualmie to do a bit of shooting in the quiet afternoon.  I managed to fill up the roll with test shots, and popped straight into the darkroom at home to develop the roll immediately.

I found that the focus appears to be fairly accurate insofar as what the focal lens shows, however the lens itself is like looking through a porthole - whereas the film in the lens below captures a rectangular frame.  Therefore, the results with this camera are going to be a bit unpredictable (I know that more will be on the film than what I see in the view lens, but I don't know exactly how much more yet.)  I also learned that the location of the shutter release (on the front of the camera body) makes it a little challenging to hold the camera steady and flat while shooting.  Several frames were blurry from camera shake, but luckily I felt it at the time and took many shots twice to get good focus.

Here are a few of my favorites from the first test run (shot on a thickly overcast day with 400 speed film - I'm extremely happy that the shutter release I built actually works!)


I'm very excited to have a new point of view to shoot in lo-fi... it is interesting to have a different perspective and framing, and it is conveniently compact enough to sneak into my gear bag for future outings.